

Sort by
DIY Automatic Sanitizer Dispe…
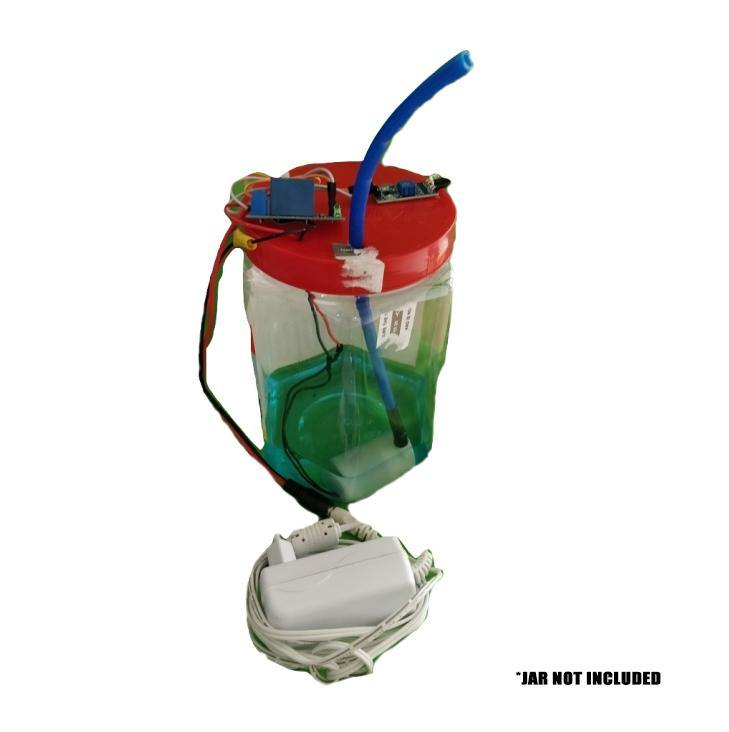
DIY Automatic Sanitizer Dispenser Kit
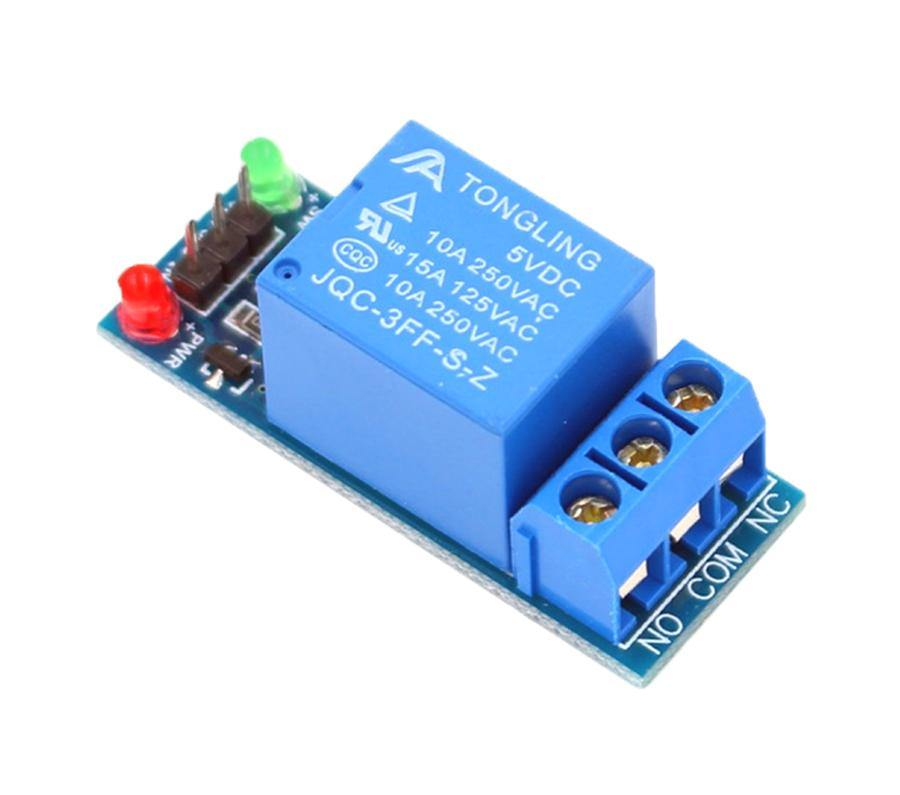
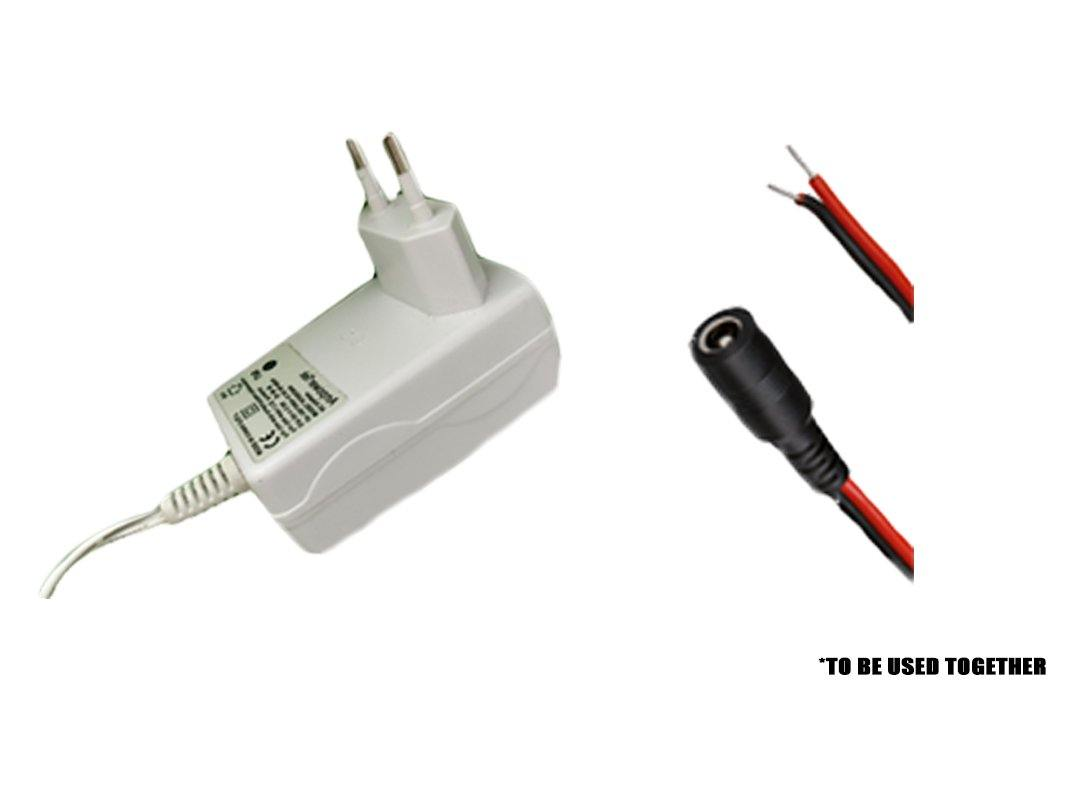
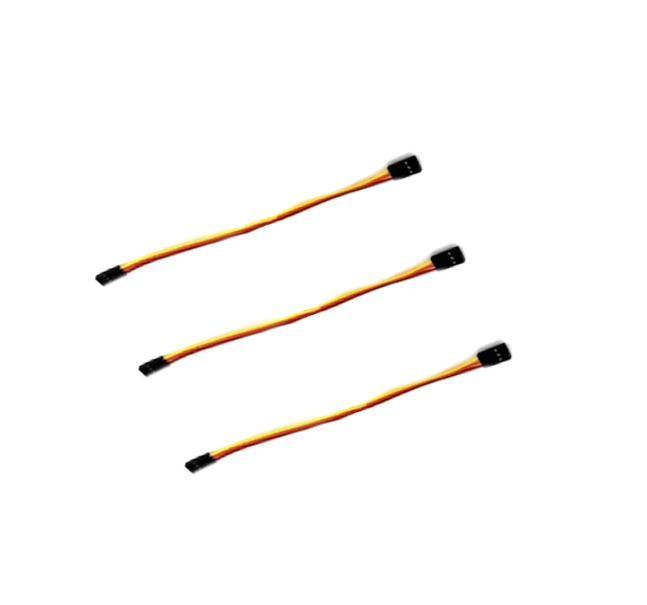
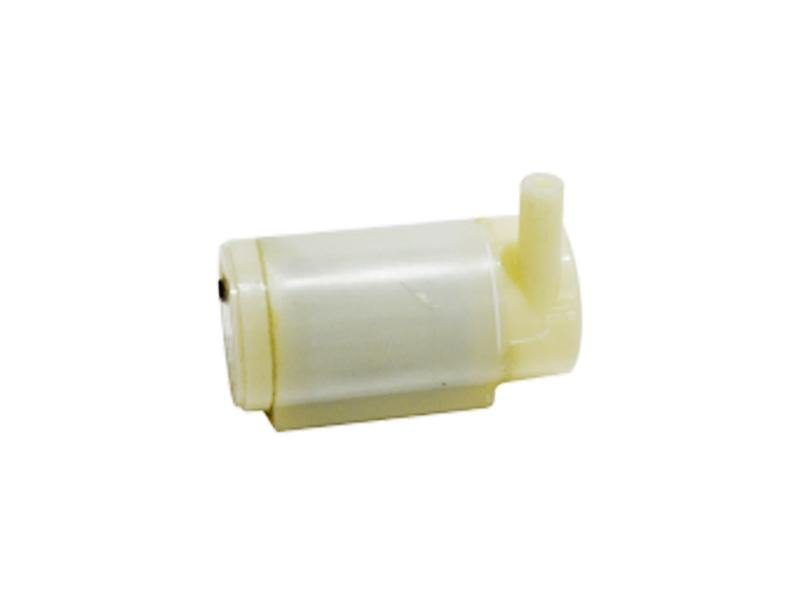
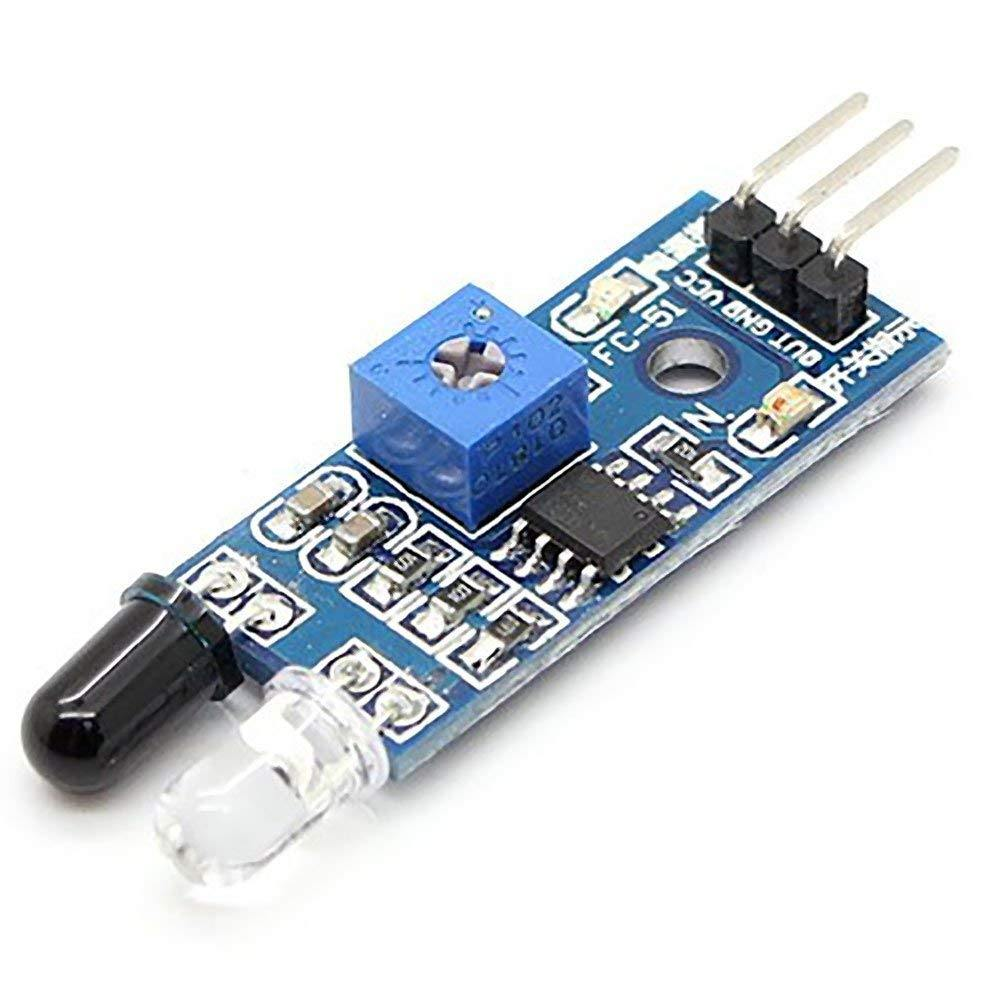
With the help of a DIY automatic Sanitizer dispenser Kit, you can make your own Automatic Sanitizer at home and protect yourself. The kit includes necessary tools and components like an
IR sensor
,
Relay Module
,
Motor Pump
,
Jumper Wires
,
Adapter
, and DC Jack/Splitter. In such times as the COVID-19 pandemic, safe and touch-free dispensing of sanitizer is really important. By reducing physical contact, an automated dispenser keeps the virus from spreading around in communal areas and prevents cross infections.
Assembling of Automatic Sanitiser Dispenser:
Step by Step video to assemble the Automatic Sanitiser Dispenser
₹377.22
Incl. GST (No Hidden Charges)
Out of Stock
MRP. ₹568.40
Incl. GST (No Hidden Charges)

DIY Automatic Sanitizer Dispenser Kit
DIY Automatic Sanitizer Dispenser Kit With the help of a DIY automatic Sanitizer dispenser Kit, you can make your own Automatic Sanitizer at home and protect yourself. The kit includes …
As low as
₹377.22
₹377.22
MRP. ₹568.40
Incl. GST (No Hidden Charges)
Out of Stock
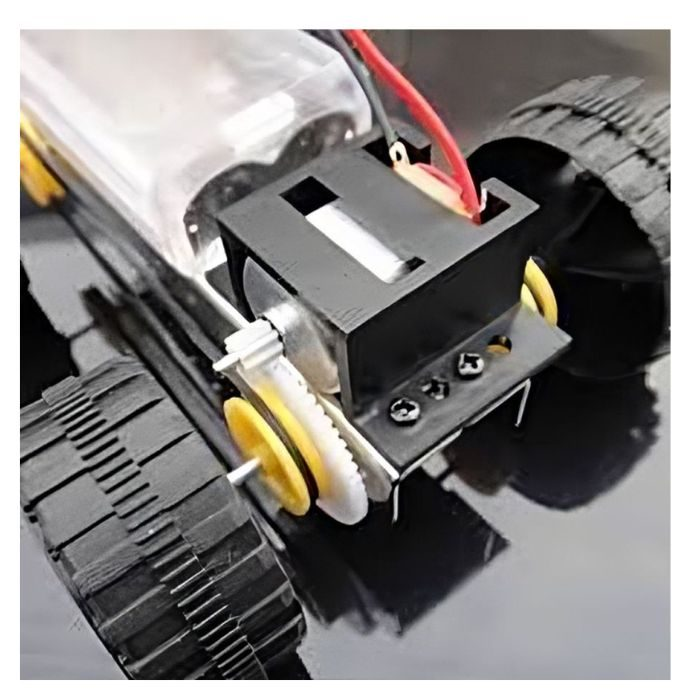
DIY Battery Powered Mini Meta…
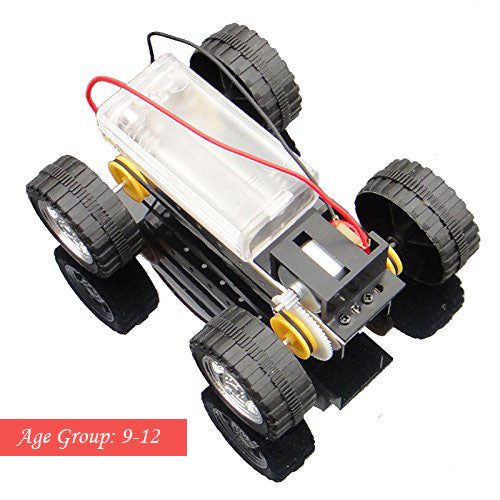
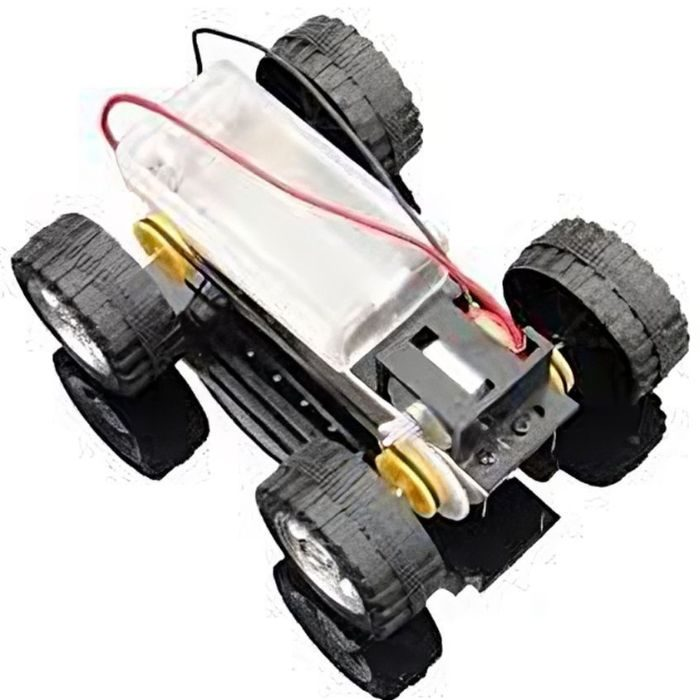
DIY Battery Powered Mini Metal Tank
Help your kid explore the fun involved in making their own battery powered Car instead of buying one. Skills developed in this DIY kit would be learning about assemblage, motor components and mechanics. Let the budding engineers understand the basics of gears, pulleys, motors, and electronic components with this simple yet elegant kit.
Features:
Do It Yourself Battery Powered Mini Metal Tank
Simple and yet educational , Develop intelligence, cultivate confidence, and improve mental quality to create new thinking.
Moveable car
Learn about
the basics of gears, pulleys, motors, and electronic components
₹290.42
MRP. ₹558.60
Incl. GST (No Hidden Charges)
Incl. GST (No Hidden Charges)
DIY Battery Powered Mini Metal Tank
DIY Battery Powered Mini Metal Tank Help your kid explore the fun involved in making their own battery powered Car instead of buying one. Skills developed in this DIY kit …
As low as
₹290.42
₹290.42
MRP. ₹558.60
Incl. GST (No Hidden Charges)
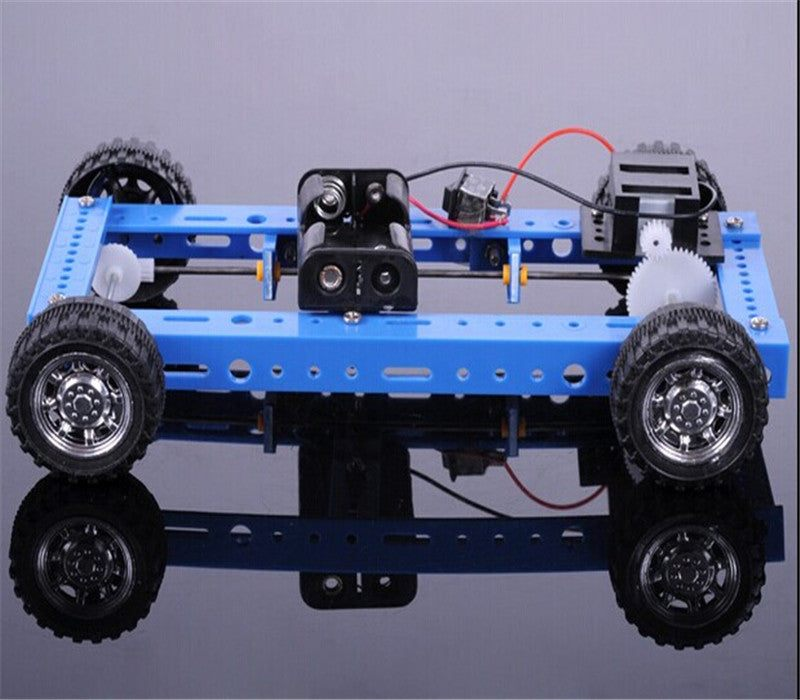
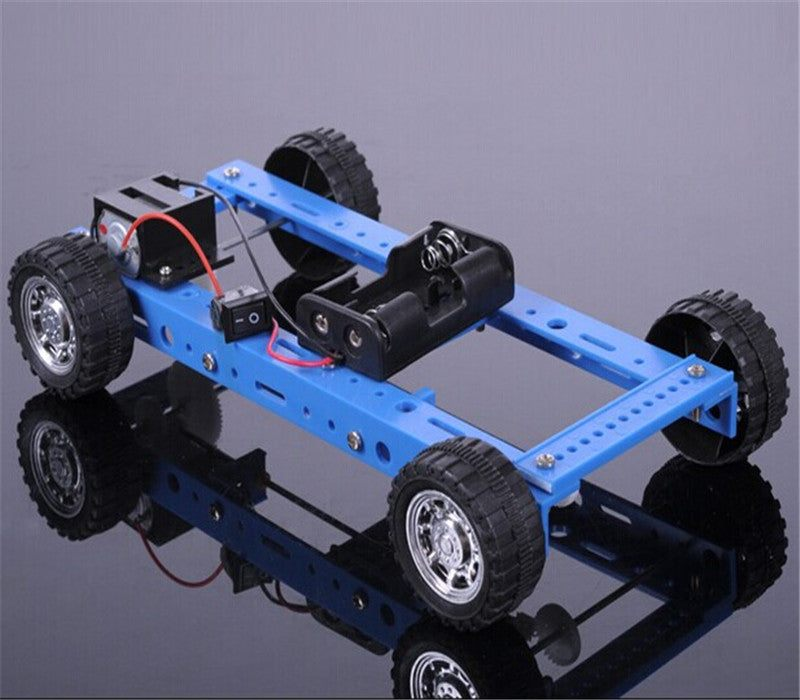
DIY Blue Electric 4-wheel Dri…
DIY Blue Electric 4-wheel Drive Car Model
This Blue Electric 4-wheel Drive Car Model is a DIY Hobby vehicle that is compatible with airplanes, Boats & Watercraft, Cars, Trucks & Motorcycles, Helicopters, Industrial & Service Vehicles, Quadcopters & Multicopters, Tanks & Military Vehicles
₹377.22
Incl. GST (No Hidden Charges)
Out of Stock
MRP. ₹698.60
Incl. GST (No Hidden Charges)

DIY Blue Electric 4-wheel Drive Car Model
DIY Blue Electric 4-wheel Drive Car Model This Blue Electric 4-wheel Drive Car Model is a DIY Hobby vehicle that is compatible with airplanes, Boats & Watercraft, Cars, Trucks & …
As low as
₹377.22
₹377.22
MRP. ₹698.60
Incl. GST (No Hidden Charges)
Out of Stock
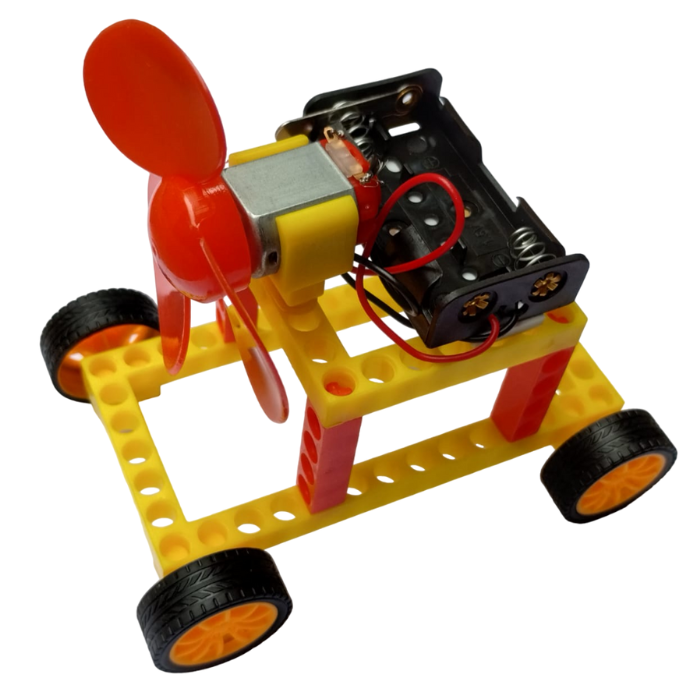
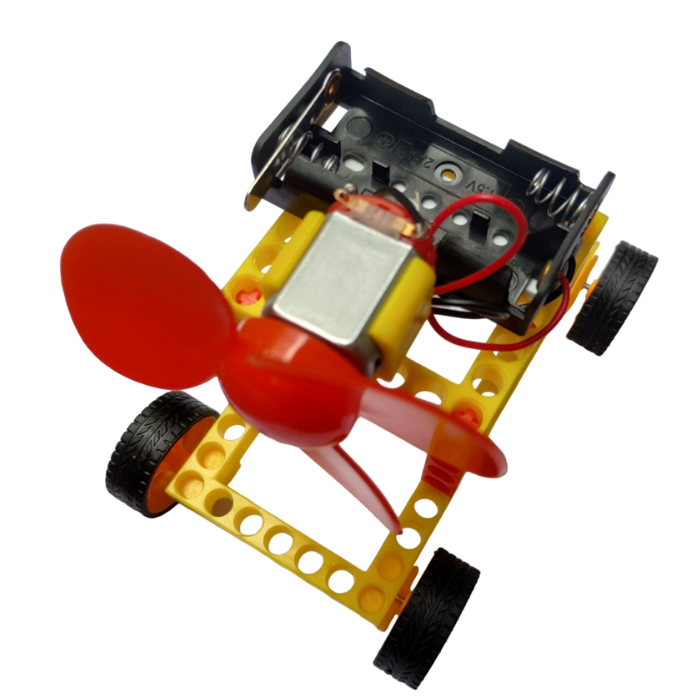
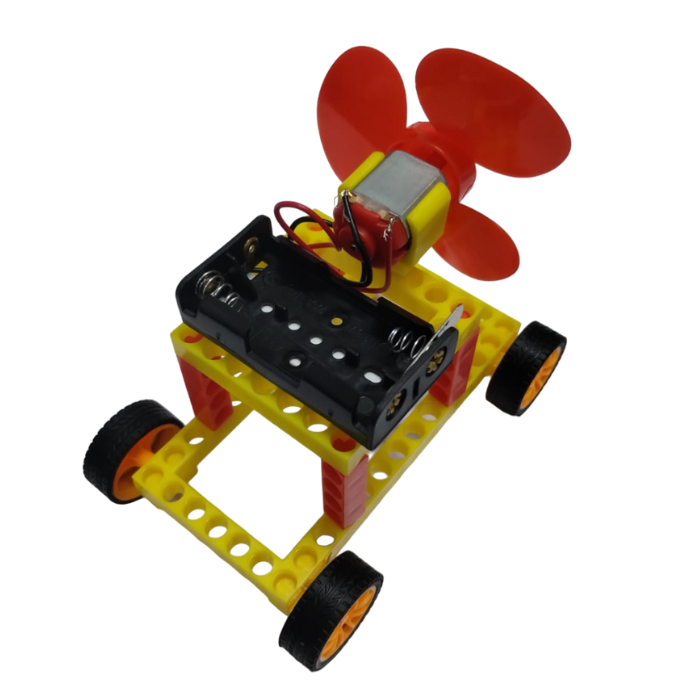
DIY Colorful Wind Generator C…
DIY Colorful Wind Generator Car
DIY Colorful Wind Generator Car Model is an Educational Self-assembling Plastic Science Physical Experiments Toy Kit for Kids. It not only guides children to understand scientific principles but also improves children's hands-on ability in the process of self-assembly.
Note:
This kit doesn't come with batteries
₹332.71
MRP. ₹624.40
Incl. GST (No Hidden Charges)
Incl. GST (No Hidden Charges)


DIY Colorful Wind Generator Car
DIY Colorful Wind Generator Car DIY Colorful Wind Generator Car Model is an Educational Self-assembling Plastic Science Physical Experiments Toy Kit for Kids. It not only guides children to understand …
As low as
₹332.71
₹332.71
MRP. ₹624.40
Incl. GST (No Hidden Charges)
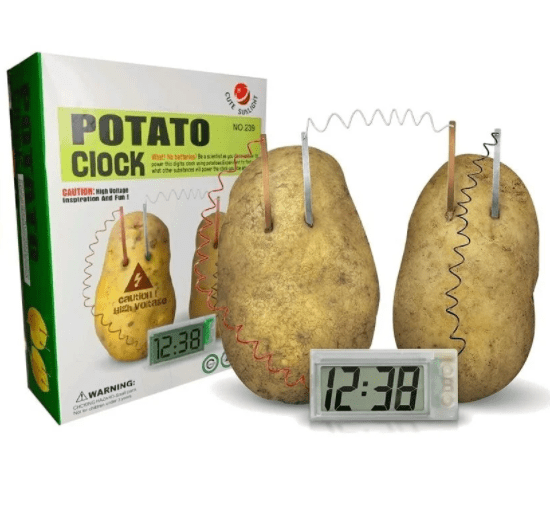
DIY Conversion of Energy Scie…
DIY Conversion of Energy Science Experiment by LED Alarm Clock using Potato
You May know Potatoes as a Good source of potassium but did you know they can be used to power an alarm clock. The two potatoes allow you to generate enough electricity to run a digital Clock. Just push the Zinc And Copper electrodes into the potatoes causing an Oxidation/Reduction reaction that is converted to low voltage.
This kit is ideal for young science enthusiasts and offers a valuable lesson on the transformative power of green science.
₹369.43
MRP. ₹628.60
Incl. GST (No Hidden Charges)
Incl. GST (No Hidden Charges)

DIY Conversion of Energy Science Experiment by LED Alarm Clock using Potato
DIY Conversion of Energy Science Experiment by LED Alarm Clock using Potato You May know Potatoes as a Good source of potassium but did you know they can be used …
As low as
₹369.43
₹369.43
MRP. ₹628.60
Incl. GST (No Hidden Charges)

DIY Creeping Tiny Gecko
DIY Creeping Tiny Gecko
DIY Creeping Tiny Gecko is a handmade DIY creeping gecko technology model puzzle toy, baby DIY parts package, need its own assembly, installation is simple, provide detailed graphic installation instructions, battery-owned, beneficial to young people’s brain development and growth, whether children Or adults are deeply loved! The product uses two AA batteries, not including the battery!
Features:
Type: Handmade DIY technology model puzzle toy.
Assembly: Comes as a parts package that requires self-assembly.
Control: Driven by a wired remote control.
Material: Made of plastic.
Power Supply: Requires 2 AA batteries (not included).
Educational Value: Beneficial for brain development and growth, suitable for both children and adults.
Instructions: Includes detailed graphic installation instructions for easy assembly.
Dimensions: Approximately 95 mm in length, 64 mm in width, and 45 mm in height
Applications:
Educational Projects: Great for teaching children about mechanics, electronics, and assembly skills.
STEM Learning: Enhances understanding of science, technology, engineering, and mathematics concepts.
Hobby Projects: Ideal for hobbyists interested in building and customizing small robotic toys.
Brain Development: Beneficial for cognitive development and problem-solving skills in both children and adults.
Interactive Play: Provides an engaging and interactive toy for children to play with.
Gift: Makes a unique and educational gift for kids and DIY enthusiasts
₹383.90
MRP. ₹558.60
Incl. GST (No Hidden Charges)
Incl. GST (No Hidden Charges)

DIY Creeping Tiny Gecko
DIY Creeping Tiny Gecko DIY Creeping Tiny Gecko is a handmade DIY creeping gecko technology model puzzle toy, baby DIY parts package, need its own assembly, installation is simple, provide …
As low as
₹383.90
₹383.90
MRP. ₹558.60
Incl. GST (No Hidden Charges)
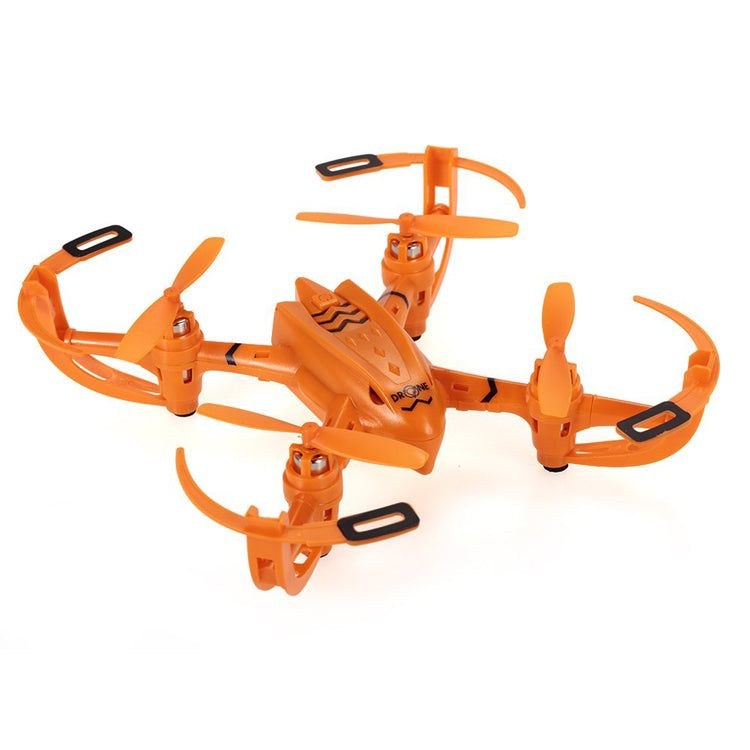
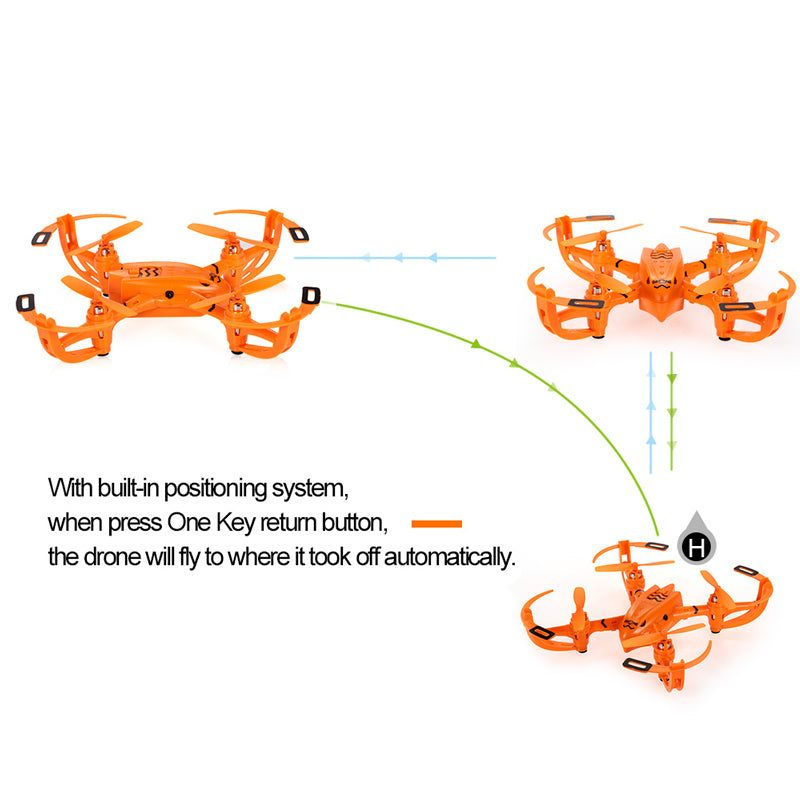
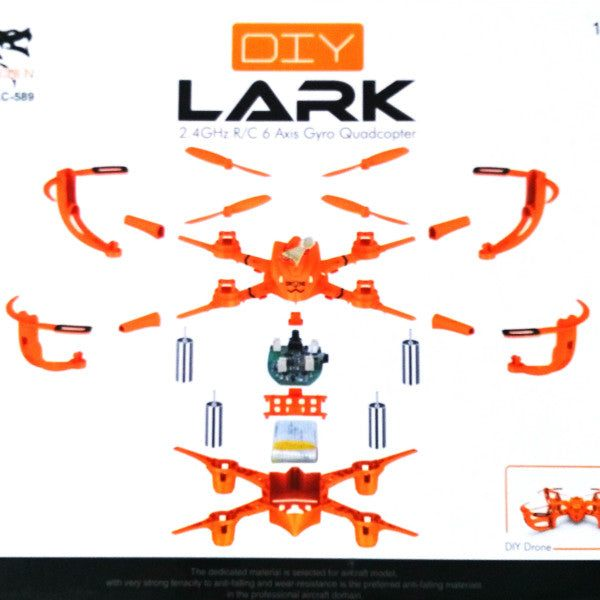
DIY CX-002 Lark Quadcopter
DIY CX-002 Lark Quadcopter
Steps to assemble the LARK Quadcopter
Take the bottom frame of the quadcopter (A-2) and place the battery (A-12) at the centre
Take out the electronic board (A-11), snap it into the frame (A-14) and mount it over the battery
Next, take the forward and reverse motor and place it into the motor mounts correctly. The motors of the same number should be mounted diagonally opposite to each other. Looking directly towards the front side of the drone frame, motor number A-15 should be on the right side and motor A-13 on the left side. On the rear side, motor A-15 will be on the left and motor A-13 on the right.
Note:
If the motor placements are incorrect, the drone may not fly as the motors will spin incorrectly to generate lift.
Make sure the motor wires face towards the centre of the drone and motor should be connected to the corresponding motor pins on the electronics board.
Install the switch button (A-16). The switch button symbol should be facing in the same orientation as the drone and the mounting point of it near the rear end of the drone.
Finish of the main body assembly by snapping on the top frame (A-1) to the bottom frame.
Secure the upper and lower body by inserting in restriction parts (A-17) into the four body arms.
Install the protective hood (A-3, A-4, A-5 and A-6) to each of the drone’s arm. Insert the hood into the restriction part first before snapping the bottom part of the hood to the fuselage.
Insert the forward and the reverse propeller to the motor shaft on the four arms of the quadcopter. With the quadcopter front facing the user, the A-10 propeller should be mounted on the right side and the A-8 propeller should be mounted on the left side. Like the motor the rear arms will have the propellers of the same part placed diagonally opposite to the front, i.e. A-10 on the left and A-8 on the right. Make sure the propellers are fully inserted into the shaft as incorrectly inserted ones may fling of the quadcopter when it starts to fly.
Note:
If the propeller placements are incorrect, the drone may not fly as the propellers will push air towards the wrong direction to generate lift.
Make sure the propellers can spin freely and the wind blows downwards. If not, the propellers might be placed incorrectly.
Place the caps on the propellers, to prevent the propellers from detaching mid-flight.
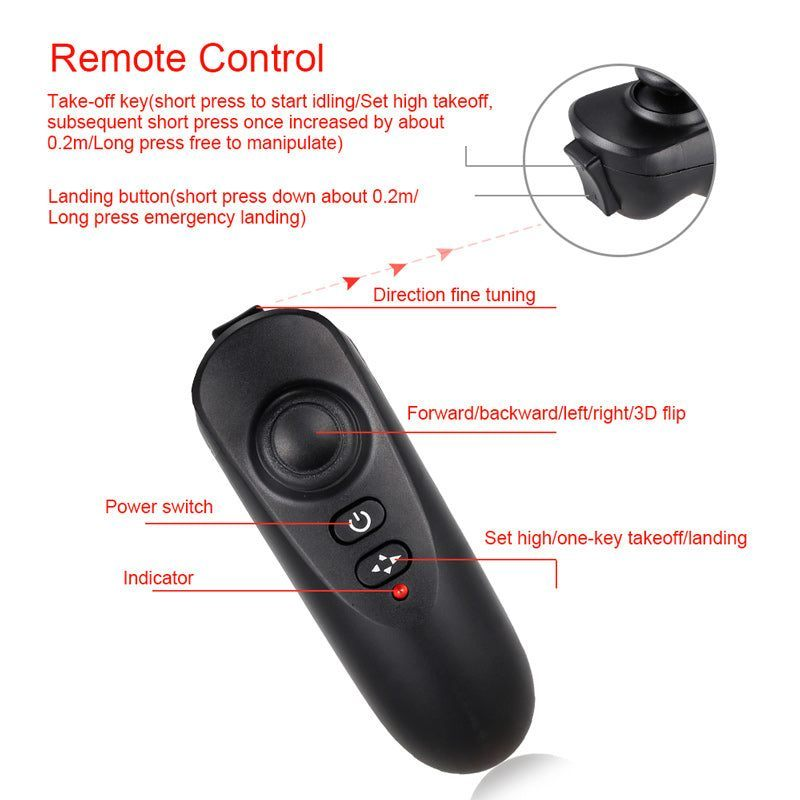
Steps to connect the remote control to the Lark Quadcopter
Put the AAA batteries in the remote control of the Lark quadcopter. Switch on both the remote control and the quadcopter. Move the joystick forward and backward and wait for the blinking on the Lark quadcopter to stop. Then press the throttle once. The Lark drone is now connected to the remote control.
₹3615.30
Incl. GST (No Hidden Charges)
Out of Stock
MRP. ₹5024.60
Incl. GST (No Hidden Charges)
DIY CX-002 Lark Quadcopter
DIY CX-002 Lark Quadcopter Steps to assemble the LARK Quadcopter Take the bottom frame of the quadcopter (A-2) and place the battery (A-12) at the centre Take out the electronic …
As low as
₹3615.30
₹3615.30
MRP. ₹5024.60
Incl. GST (No Hidden Charges)
Out of Stock
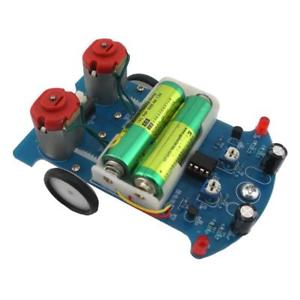
DIY D2-1 Intelligent Line fol…
DIY D2-1 Intelligent Line follower/Tracing Car Kit
Get this DIY Intelligent Line follower/Tracking Smart Car Kit with all essential parts to build and Learn your own DIY line follower robot car This car just needs a 3V power supply to operate from two AA batteries. This comes with two powerful geared BO motors and all the required parts and ICs to run the robot, you do not need to use any driving board or coding to program it. you just need little soldering knowledge to assemble this bot.
Note:
This kit doesn't come with a battery
₹254.82
MRP. ₹418.60
Incl. GST (No Hidden Charges)
Incl. GST (No Hidden Charges)

DIY D2-1 Intelligent Line follower/Tracing Car Kit
DIY D2-1 Intelligent Line follower/Tracing Car Kit Get this DIY Intelligent Line follower/Tracking Smart Car Kit with all essential parts to build and Learn your own DIY line follower robot …
As low as
₹254.82
₹254.82
MRP. ₹418.60
Incl. GST (No Hidden Charges)
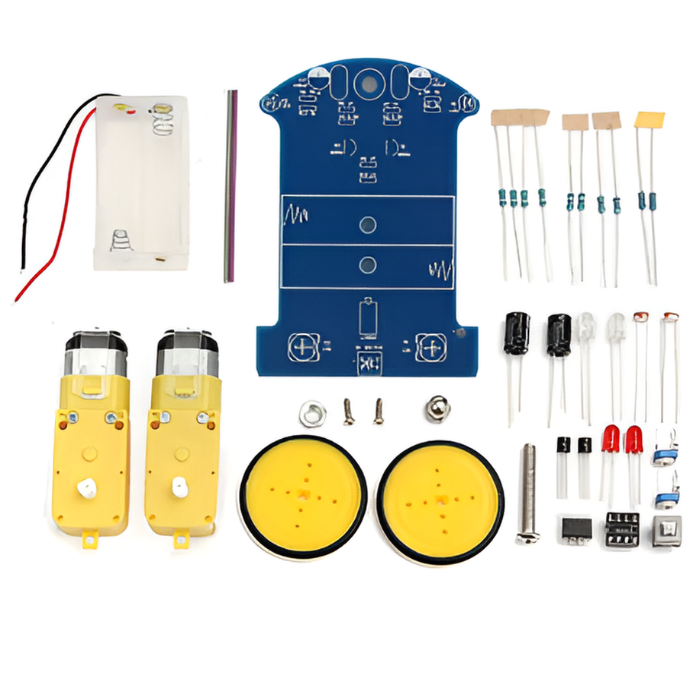
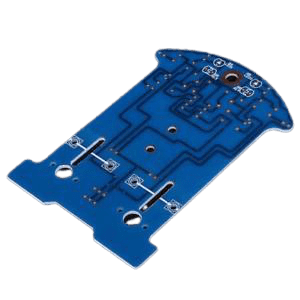
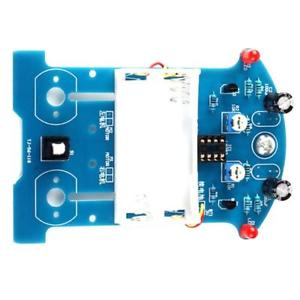
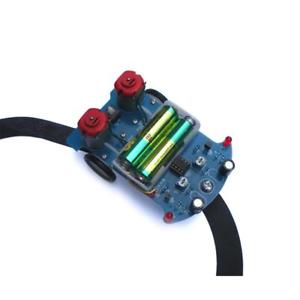
DIY D2-5 Intelligent Tracking…
DIY D2-5 Intelligent Tracking Line Car Kit
LM393 at any time compared the size of two photosensitive resistors when there is an imbalance (such as one side of the black runway) immediately control the side of the motor stop, the other side of the motor to accelerate the rotation so that the direction of the car to restore the correct direction. The whole process is a closed-loop control, so it can be quickly and sensibly controlled
Note:
This kit doesn't come with batteries
₹332.71
MRP. ₹558.60
Incl. GST (No Hidden Charges)
Incl. GST (No Hidden Charges)


DIY D2-5 Intelligent Tracking Line Car Kit
DIY D2-5 Intelligent Tracking Line Car Kit LM393 at any time compared the size of two photosensitive resistors when there is an imbalance (such as one side of the black …
As low as
₹332.71
₹332.71
MRP. ₹558.60
Incl. GST (No Hidden Charges)
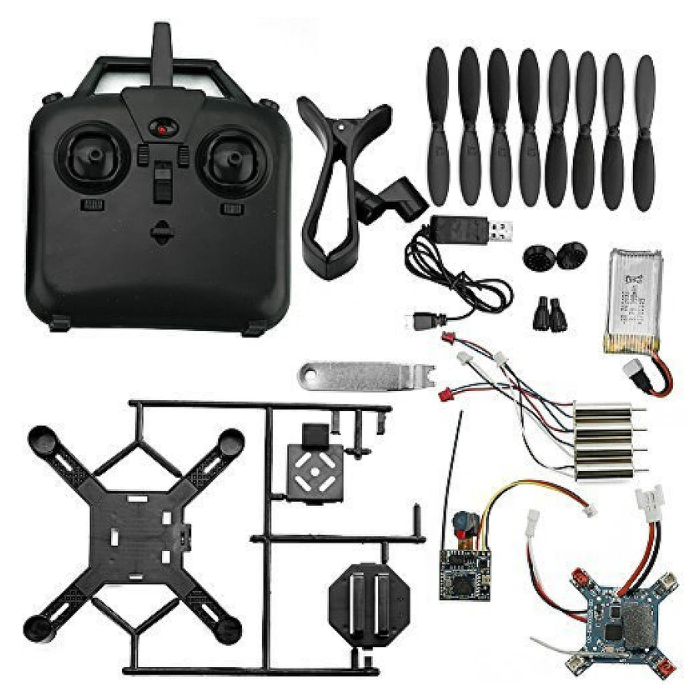
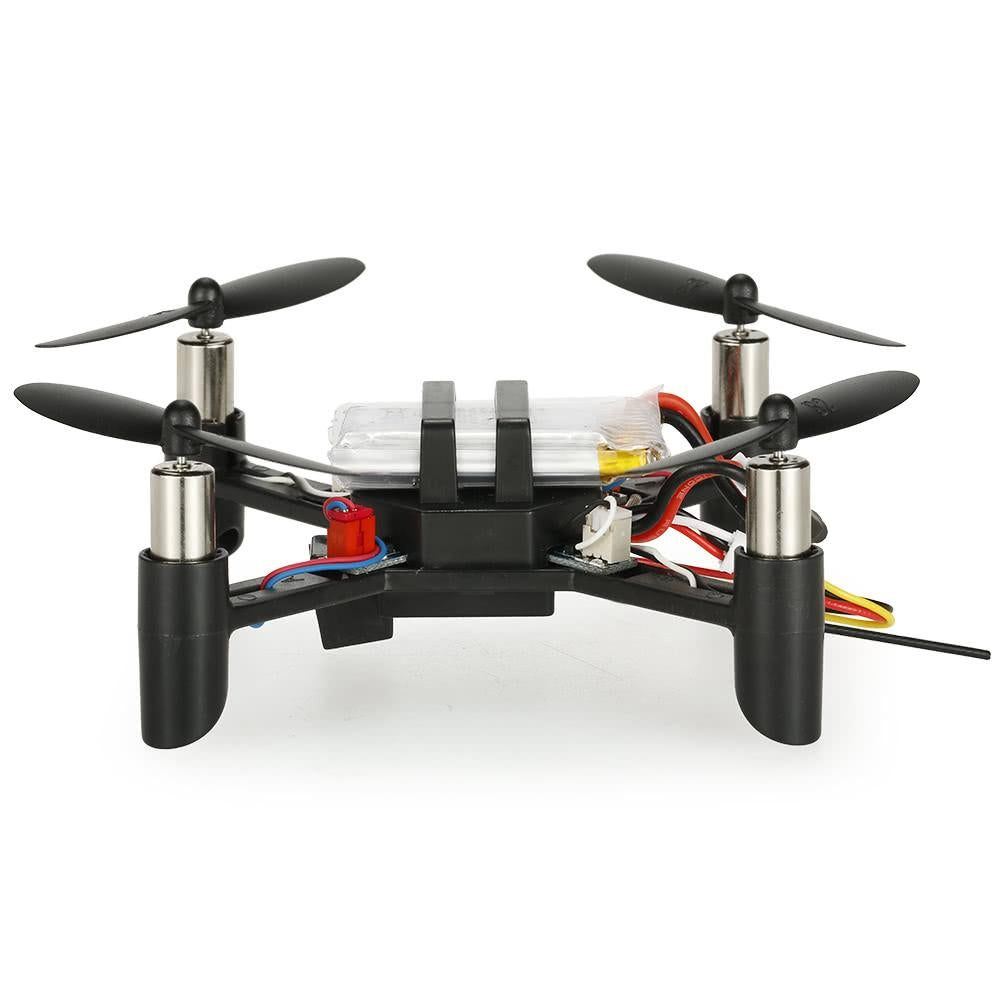
DIY Drone Kit With Manual (Ca…
DIY Drone Kit With Manual (Camera Not Included)
The DM002 Mini DIY Drone is an excellent and affordable drone making kit that allows you to build your own quadcopter or
drone
without requiring advanced mechanical skills or soldering expertise.
Assembling the DM002 drone is a fun and exciting process, and once you're finished, you'll have a quadcopter that is both enjoyable to fly and highly functional.
It's hard to come across a more cost-effective
drone kit
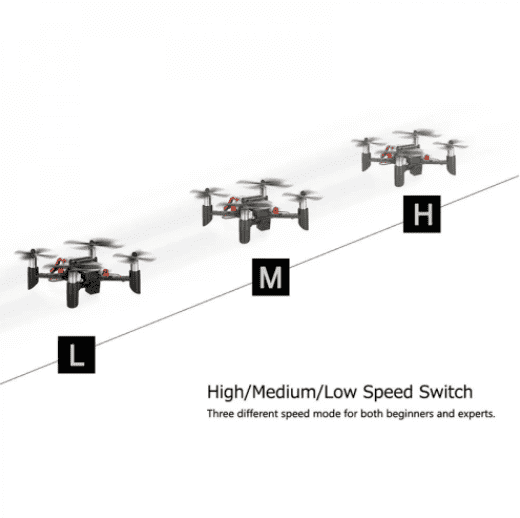
that performs as well as the DM002. This quadcopter is quick, nimble, and relatively easy to pilot, with 3 different speed modes to choose from.
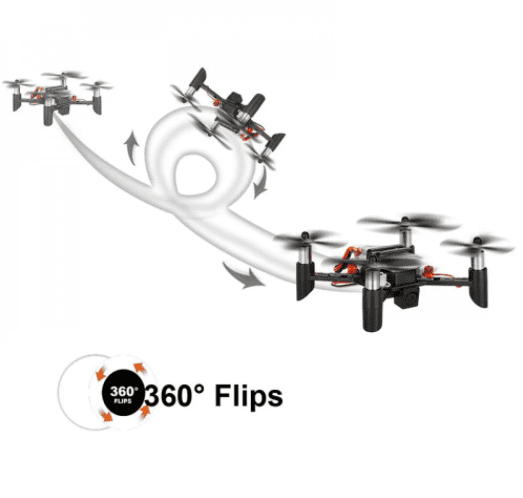
You can start in slow mode and gradually progress to medium and high speeds as you become more comfortable flying it. Additionally, the DM002 drone making kit has a button that allows you to perform 360° flips with ease.
Function
/ ascend/descend / forward / backward/side flying / Slow/Medium/High speed/turn round / 360°rolling action / 360° accurate localization / LED / One key return
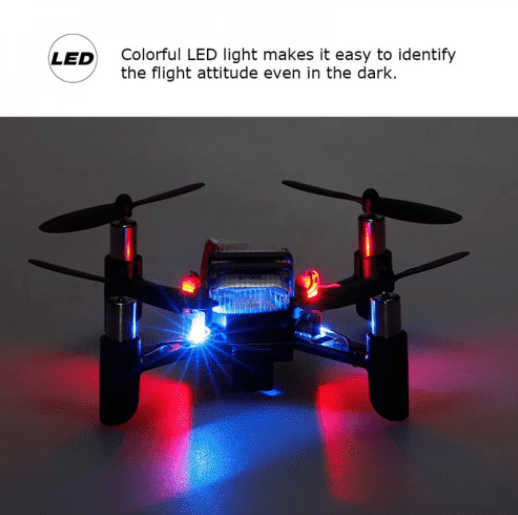
LED status -
1)Red when charger is connected to the battery.
2)No LED blinks when the charger is connected to the source(while charging).
3)Again red LED glows when the battery is charged completely.
Note:
This model(DM002) doesn't come with Wifi and FPV Camera
Check out our collection of high-quality
parts of drone
to find everything you need for your drone projects!
Build, Fly, and Record, Check Out -
DM002 Drone Kit with Camera
!
Key Features
DIY drone assembly kit for hands-on learning
Supports integrated camera module (camera not included)
WiFi connectivity for real-time control and telemetry
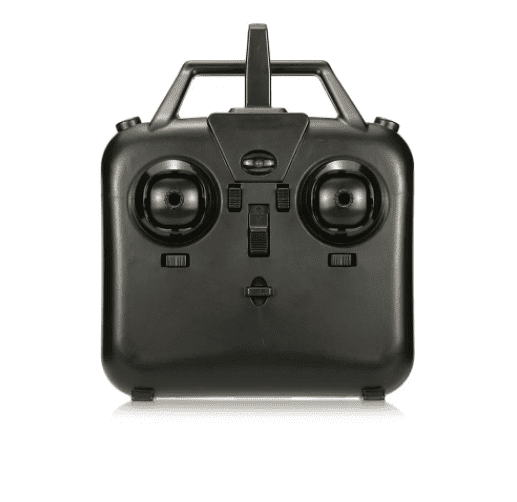
Operates via remote control for easy navigation
Stable flight performance for beginners and hobbyists
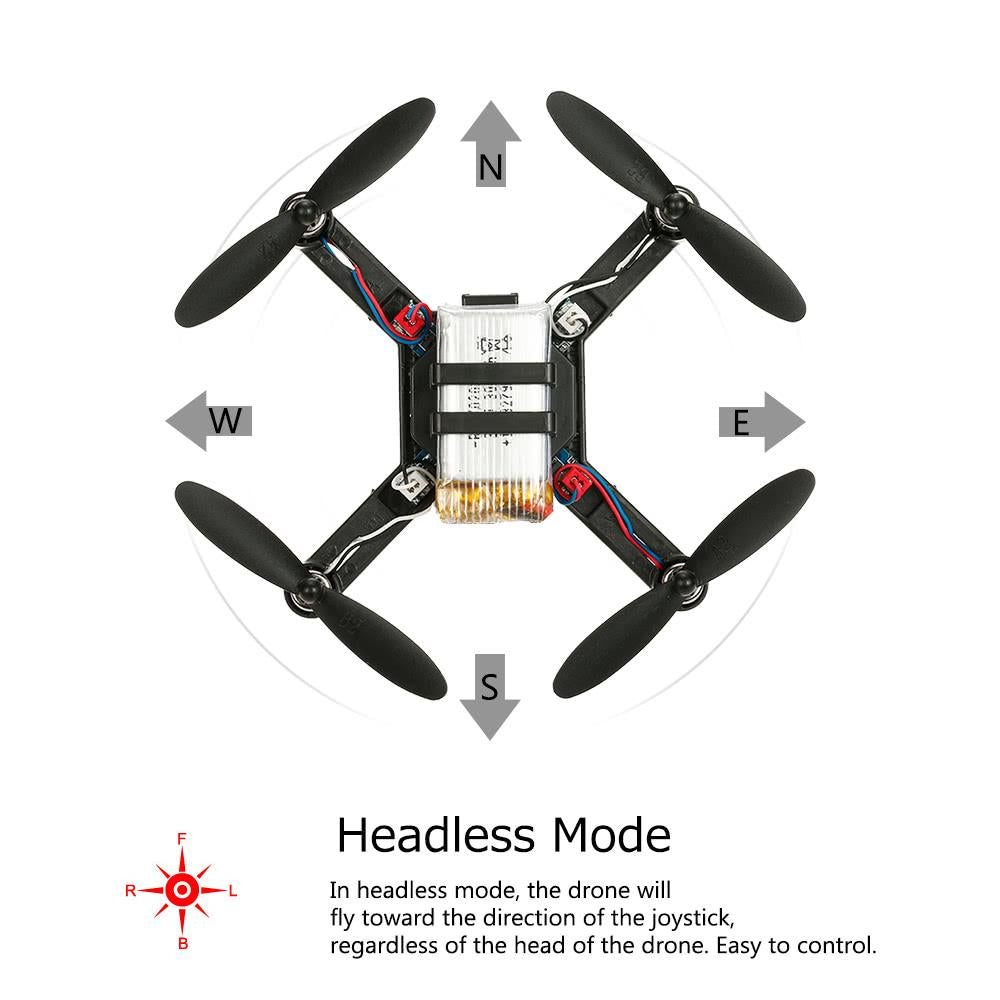
Headless mode for simplified directional control
Comes with a rechargeable battery for extended usage
Built-in LED lights for visibility and night flying
Compact and lightweight design for indoor/outdoor use
Comparison:
Features
DM002
DM002HW
Speed control
Yes
Yes
Wifi FPV Camera
No
Yes
Wifi connection
No
Yes
Colorful LED's
Yes
Yes
Smartphone control
No
Yes
Altitude Hold
Yes
Yes
headless mode
Yes
Yes
One key taking off
Yes
Yes
One key landing
Yes
Yes
Gyroscope
6-axis
6-axis
360 degree flip
Yes
Yes
Auto Home
Yes
Yes
Battery
3.7V 300mAh Lipo Battery
3.7V 300mAh Lipo Battery
Charging Time
60-80 minutes
60-80 minutes
Frequency
2.4Ghz
2.4Ghz
Flight time
around 7 minutes
around 7 minutes
Operating environment
Indoor and outdoor
Operating environment
Assembly guide
Included
Included
Assembly tools
Included
Included
Get
FlySky FS-CT6B RC Transmitter and Receiver
for Long Range Control!
Also check
1050 mAh 3.7V single-cell rechargeable LiPo battery
,
Assembly of DM002 DIY Drone
₹2157.61
MRP. ₹4898.60
Incl. GST (No Hidden Charges)
Incl. GST (No Hidden Charges)
DIY Drone Kit With Manual (Camera Not Included)
DIY Drone Kit With Manual (Camera Not Included) The DM002 Mini DIY Drone is an excellent and affordable drone making kit that allows you to build your own quadcopter or …
As low as
₹2157.61
₹2157.61
MRP. ₹4898.60
Incl. GST (No Hidden Charges)
