

Sort by
TFMiNi micro LiDAR Sensor Mod…
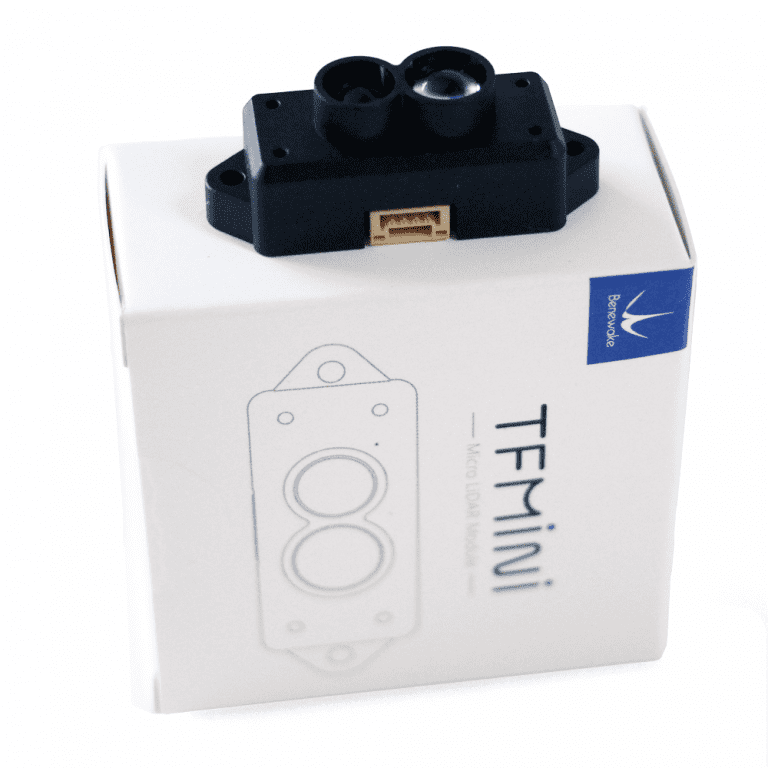
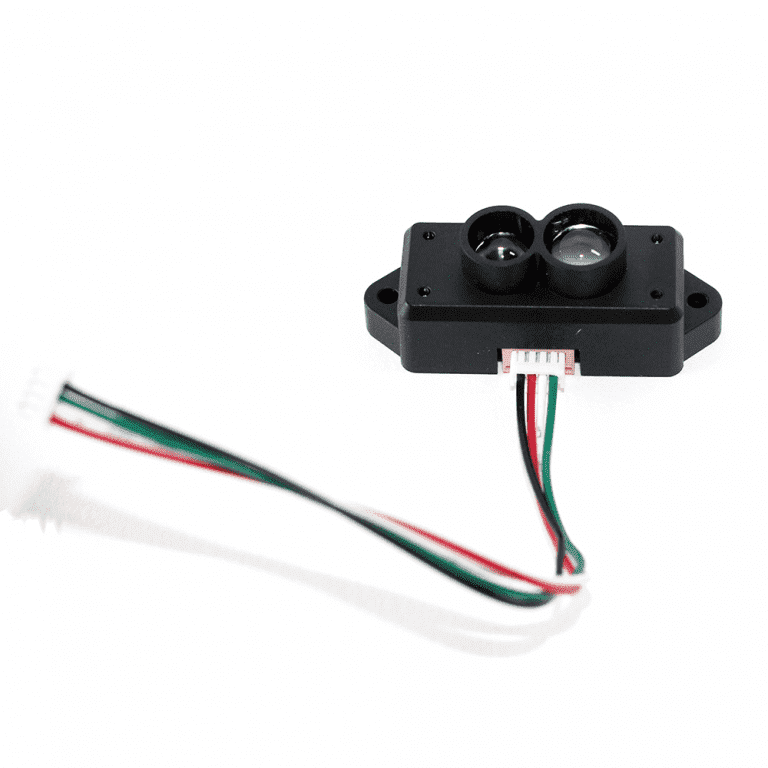
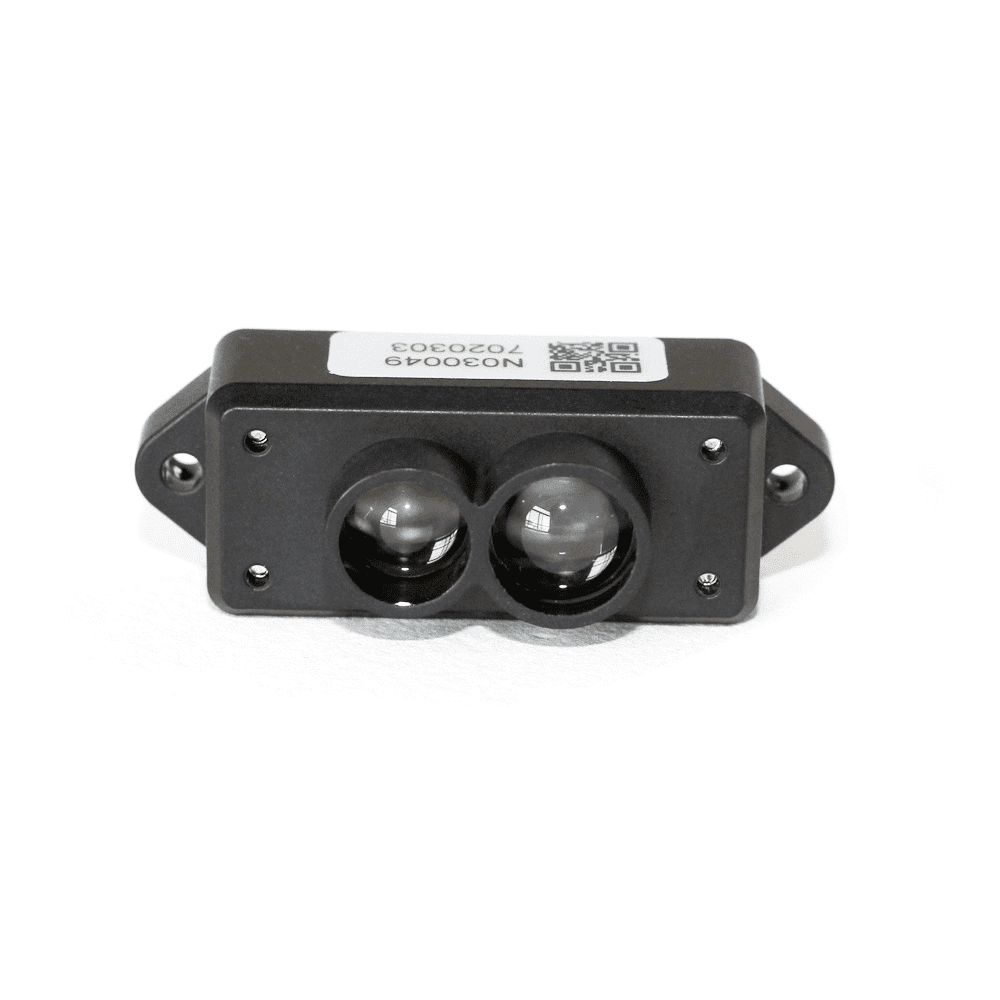
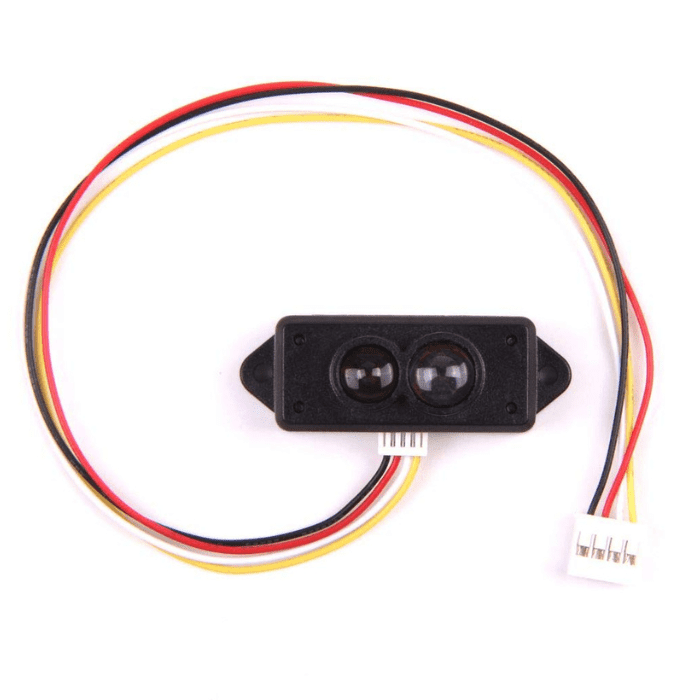
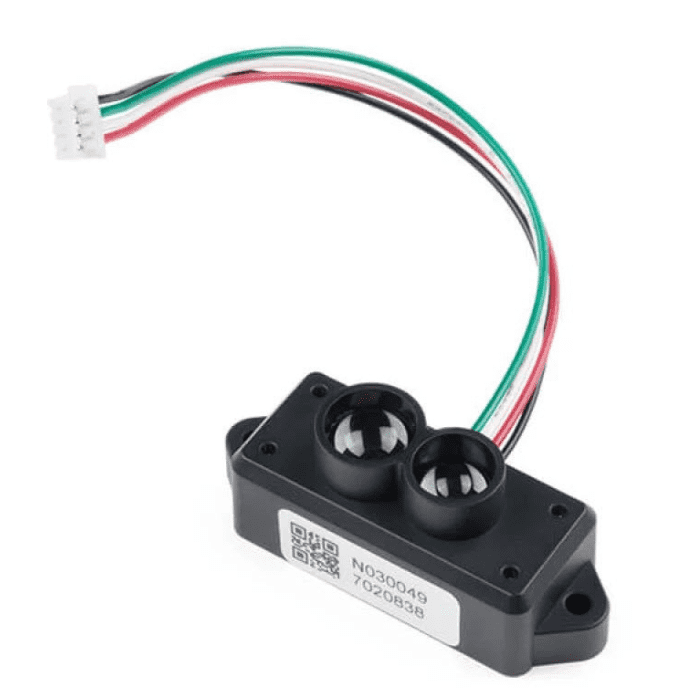
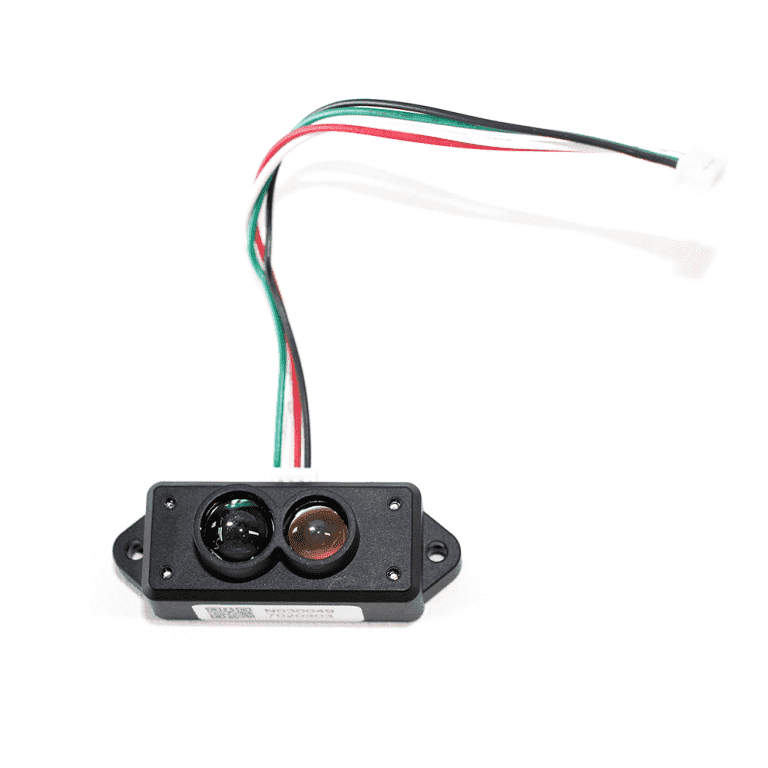
TFMiNi micro LiDAR Sensor Module
The TFMini micro LiDAR distance sensor module for
drones
UAV UAS robots (12m) Laser Range Finder sensor has its unique optical, structural, and electronic designs, the product possesses 3 major advantages, low cost, tiny volume and low power consumption. The
sensor
has built-in algorithm adapted to indoor and outdoor environments can guarantee an excellent ranging performance at a low cost and in a tiny volume, which highly expands the application fields and scenarios of LiDAR and lays a solid foundation for future “eyes” in the smart era.
Note:
This product does not use laser light for ranging. Instead it contains an LED and optics. Many such systems are being marketed under the name "LiDAR," although it may be more appropriate to think of this device as a "Time-of-Flight Infrared Rangefinder". It differs significantly from traditional IR rangefinders in that it uses ToF to determine range and not triangulation
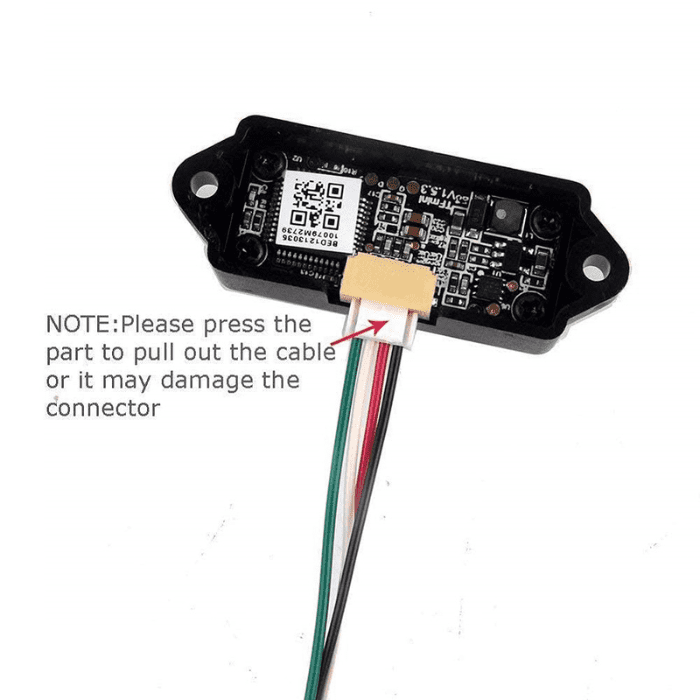
Connection:
Applications:
Unidirectional ranging LiDAR. Obstacle avoidance. Assisted landing.
Terrain following.
Robots outdoor obstacle avoidance.
Intelligent parking. Crane operations.
Vehicle position sensing.
Vehicle detection for barrier gate control.
₹4015.88
Incl. GST (No Hidden Charges)
Out of Stock
MRP. ₹7205.80
Incl. GST (No Hidden Charges)
TFMiNi micro LiDAR Sensor Module
TFMiNi micro LiDAR Sensor Module The TFMini micro LiDAR distance sensor module for drones UAV UAS robots (12m) Laser Range Finder sensor has its unique optical, structural, and electronic designs, …
As low as
₹4015.88
₹4015.88
MRP. ₹7205.80
Incl. GST (No Hidden Charges)
Out of Stock

The Official Raspberry Pi Beg…
The Official Raspberry Pi Beginner's Guide 5th Ed
The Official Raspberry Pi Beginner's Guide 5th Ed is the ultimate resource for anyone looking to explore the world of Raspberry Pi 5 and Raspberry Pi OS. Whether you're a beginner or an experienced enthusiast, this comprehensive guide has you covered.
Learn how to set up your Raspberry Pi, install the operating system, and harness its full potential as a powerful computer. Dive into the world of coding with step-by-step guides using both Scratch 3 and Python programming languages. Unlock your creativity and bring your ideas to life by connecting electronic components to Raspberry Pi's GPIO pins.
Published by Raspberry Pi Press, this book directly supports the Foundation's charitable mission to make computing and digital making accessible to people worldwide.
Get notified as soon as this valuable resource is back in stock by entering your email address. Shop with confidence knowing that we offer a satisfaction and refund guarantee for your peace of mind.
The Official Raspberry Pi Beginner's Guide 5th Ed - your gateway to Raspberry Pi excellence!
₹2652.77
MRP. ₹4198.60
Incl. GST (No Hidden Charges)
Incl. GST (No Hidden Charges)

The Official Raspberry Pi Beginner's Guide 5th Ed
The Official Raspberry Pi Beginner's Guide 5th Ed The Official Raspberry Pi Beginner's Guide 5th Ed is the ultimate resource for anyone looking to explore the world of Raspberry Pi …
As low as
₹2652.77
₹2652.77
MRP. ₹4198.60
Incl. GST (No Hidden Charges)
Thermistor Temperature Sensor…
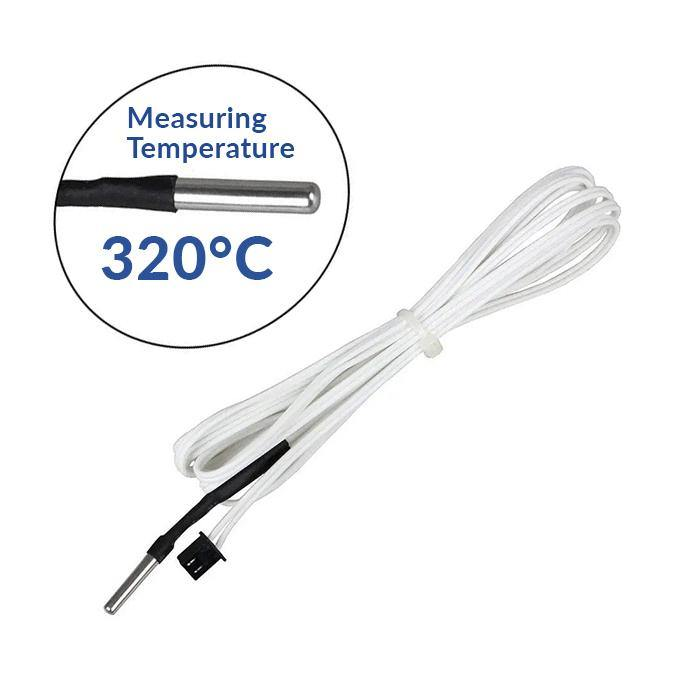
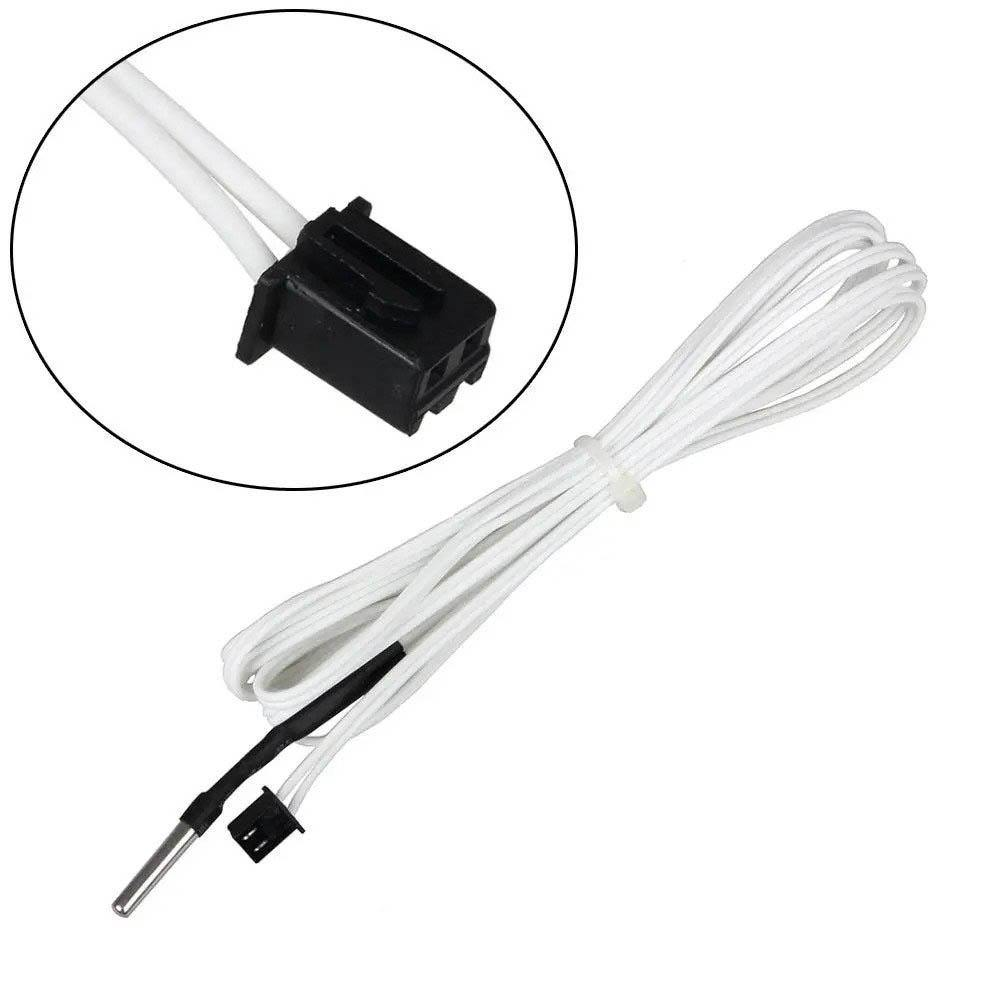
Thermistor Temperature Sensor HT-NTC100K- 2M
NTC type temperature sensor 10K 1% with Two tinned copper wire cables consists of NTC element, SUS housing, two tinned wire cable, terminal, and temperature probe. The sensor is protected by a rubber or a stainless steel capsule, both waterproof. It is a proper solution for either heating or cooling applications.
Thermistor temperature measurement is stable. The temperature measurement of the upgraded HT-NTC100K can be up to 350 degrees, can effectively replace the K-type thermocouple. It helps much to solve the issues of strict requirements of K-type thermocouple wiring, and the line is long which is susceptible to get external interference and results in temperature fluctuation that can affect the printing quality. If need to print high-temperature filament, the HT-NTC100K thermistors are highly recommended.
Applications:
Household air conditioner
Solar water heater
Refrigerator
Stove
Induction cooker
Electric oven
Home appliances
Floor heating
3D printers
₹85.68
Incl. GST (No Hidden Charges)
Out of Stock
MRP. ₹131.60
Incl. GST (No Hidden Charges)


Thermistor Temperature Sensor HT-NTC100K- 2M
Thermistor Temperature Sensor HT-NTC100K- 2M NTC type temperature sensor 10K 1% with Two tinned copper wire cables consists of NTC element, SUS housing, two tinned wire cable, terminal, and temperature …
As low as
₹85.68
₹85.68
MRP. ₹131.60
Incl. GST (No Hidden Charges)
Out of Stock
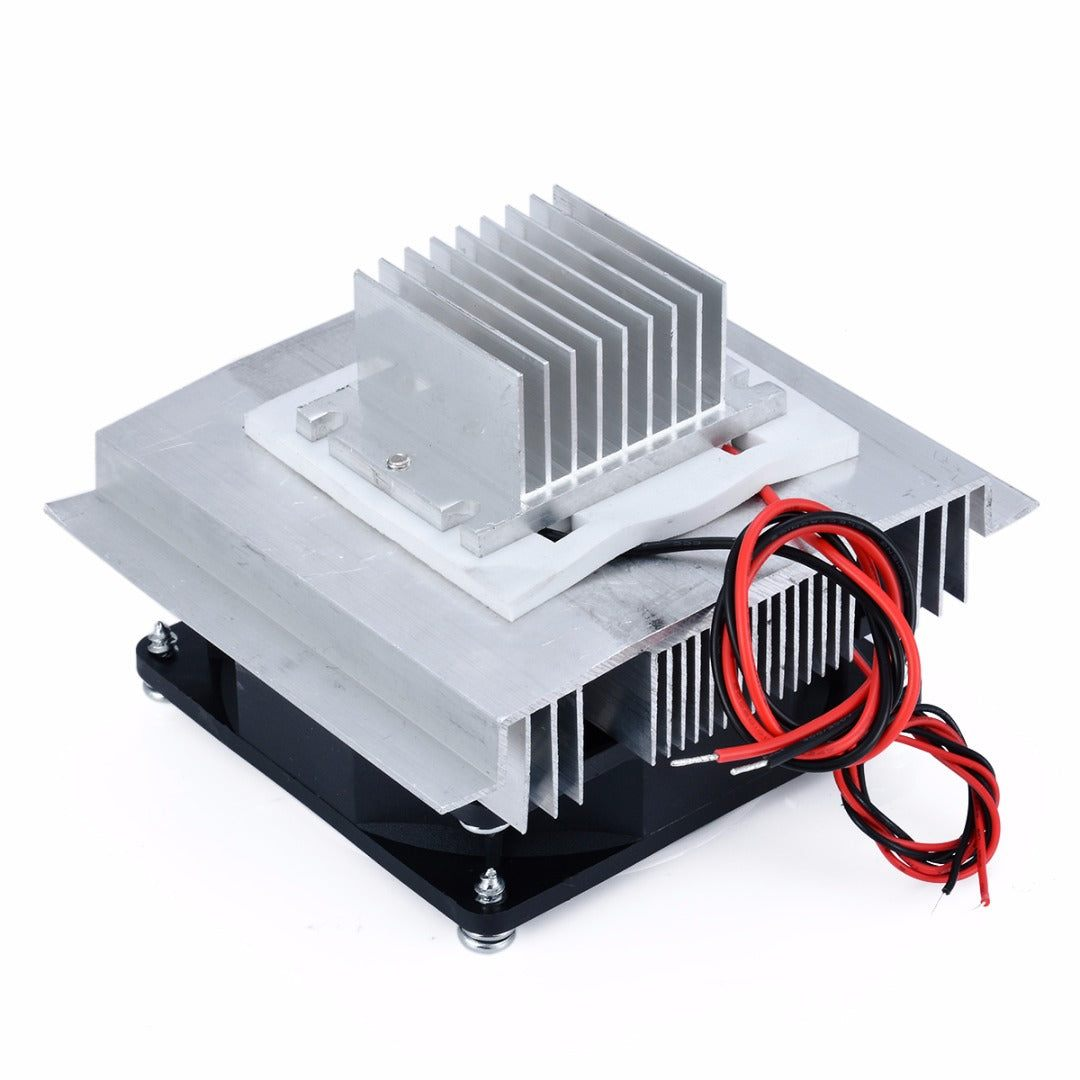
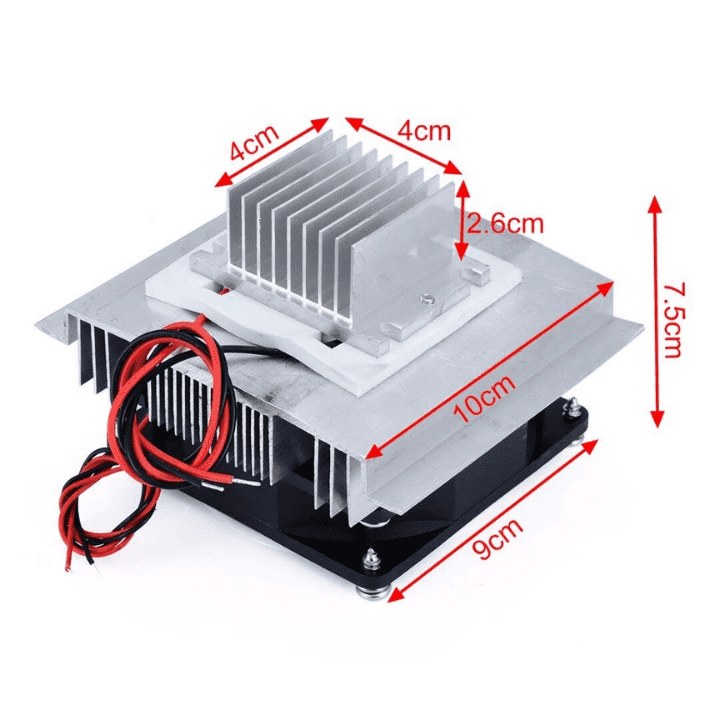
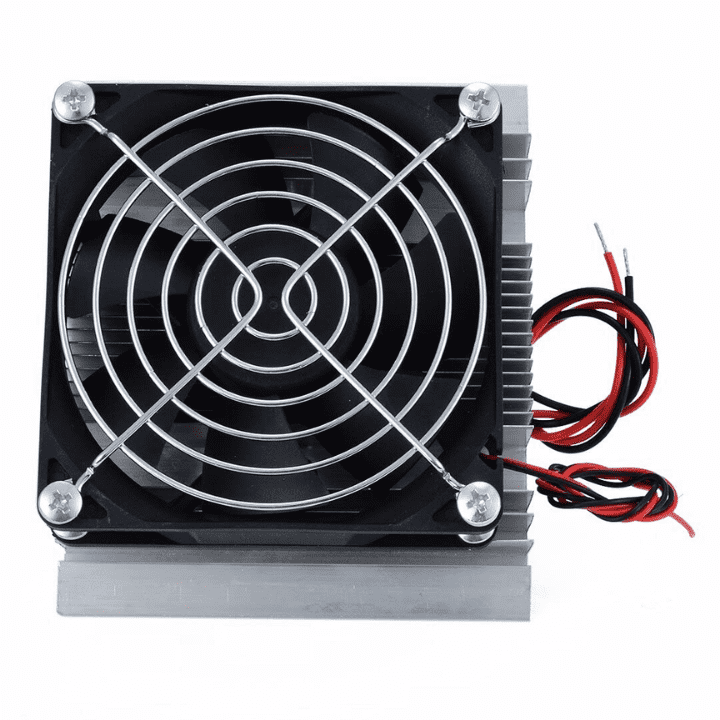
Thermoelectric Peltier Refrig…
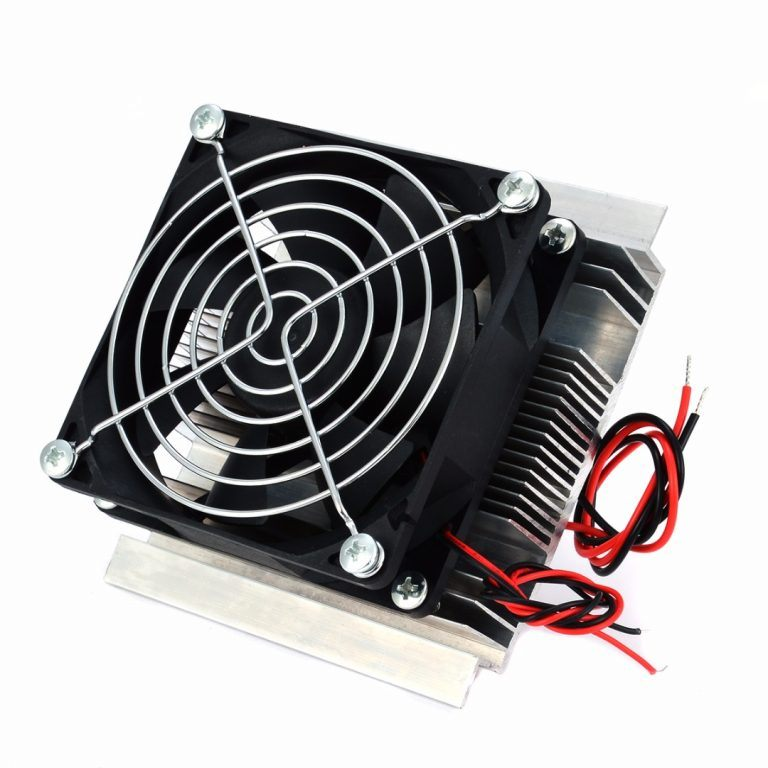
Thermoelectric Peltier Refrigeration Cooling System DIY Kit With TEC-12706 Peltier
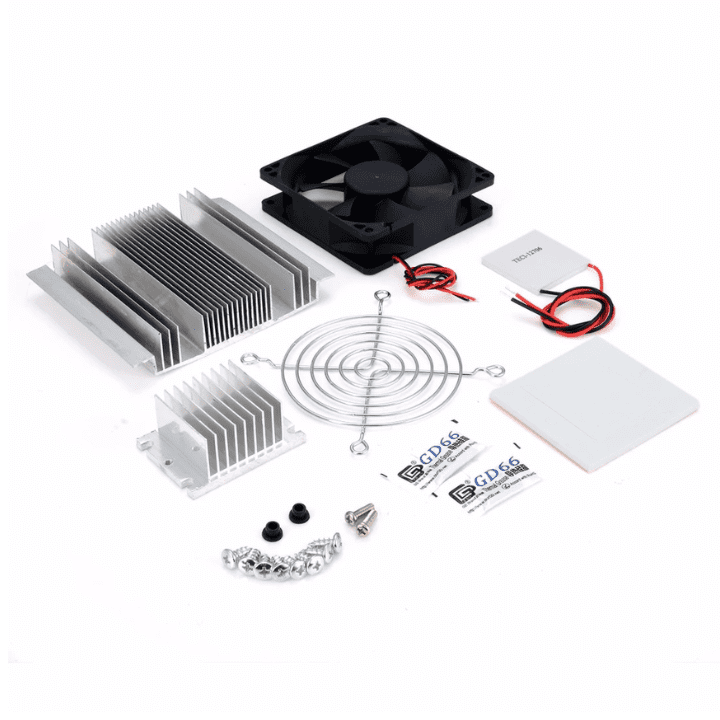
Semiconductor coolers are a form of solid-state cooling that incorporates both semiconductor technologies and electronic assembly techniques. The thermoelectric Peltier refrigeration cooling system DIY kit is one such example.
The DIY kit is a semiconductor cooling kit that uses a TEC1-12706 Thermoelectric Cooler Peltier Module. The kit has 2 heat sinks, the bigger one is for the hotter side and the smaller one is for the cooler side. The bigger the heat sink, the greater dissipation of the heat.
The fan, also included in this kit acts as a radiator. This is attached to the bigger
heat sink
.
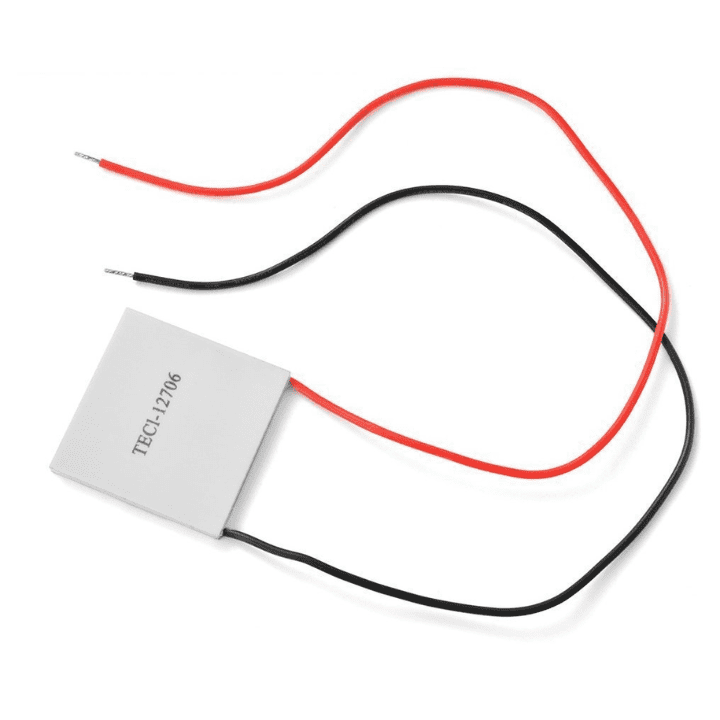
The
TEC1-12706 thermoelectric Peltier module
is sandwiched between the two heat sinks. The module will reduce the temperature.
Note:
This is an unassembled kit.
How To Assemble The Thermoelectric Peltier Refrigeration Cooling System DIY Kit:
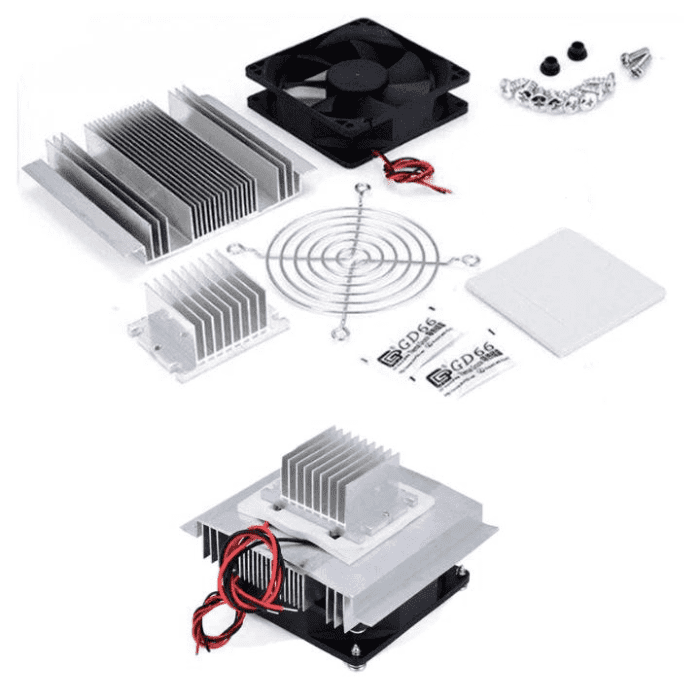
First, take the large heatsink and the cotton washer (which will hold the Peltier in place), remove the cotton washer’s sticker and place it on top of the large heat sink, making sure to align it.
Apply thermal grease or heatsink compound before installing the
TEC1-12706 Peltier
module
(the heatsink compound/thermal grease increases the heat transfer rate).
Then, firmly press the
TEC1-12706 Peltier
module
against the heatsink (Remember the cold side of the Peltier module is always the surface with letterings)
Apply the heatsink compound/thermal grease above the
TEC1-12706 Peltier
module
and place the small heatsink on top of it and attach the screws
Place the brushless dc fan on top of the large heat sink, align it properly, and screw it in place. Next, attach the safety grill to the brushless dc fan and then screw it in place.
Read our blog
Peltier module working principle
where we explained what is a Peltier Cooler, how it works, things to keep in mind while using a Peltier, and applications of Peltier.
Features:
Cooling Technology: Utilizes a TEC1-12706 Thermoelectric Cooler (Peltier module) for efficient heat transfer.
Components Included: Comes with a Peltier module, heat sinks, a cooling fan, thermal paste, and necessary screws.
Operation: The Peltier module creates a temperature difference when an electric current is applied, with one side becoming hot and the other cold.
Power Supply: Typically operates at 12 volts.
Heat Dissipation: Includes a heat sink and fan to dissipate heat from the hot side of the Peltier module.
Compact Design: Small and easy to integrate into various cooling projects.
Applications: Suitable for small-scale cooling projects like cooling electronic components, small refrigerators, or custom cooling solutions for CPUs
Applications:
Pet Air Conditioner.
Portable refrigerators.
Medical instruments.
Mini Fridge
Portable Cooler Projects
Pet Space or Enclosure Cooling
Electronics Component Cooling
Medical and Laboratory Equipment Cooling
IoT and Embedded System Thermal Management
₹593.09
MRP. ₹1048.60
Incl. GST (No Hidden Charges)
Incl. GST (No Hidden Charges)

Thermoelectric Peltier Refrigeration Cooling System DIY Kit With TEC-12706 Peltier
Thermoelectric Peltier Refrigeration Cooling System DIY Kit With TEC-12706 Peltier Semiconductor coolers are a form of solid-state cooling that incorporates both semiconductor technologies and electronic assembly techniques. The thermoelectric Peltier …
As low as
₹593.09
₹593.09
MRP. ₹1048.60
Incl. GST (No Hidden Charges)
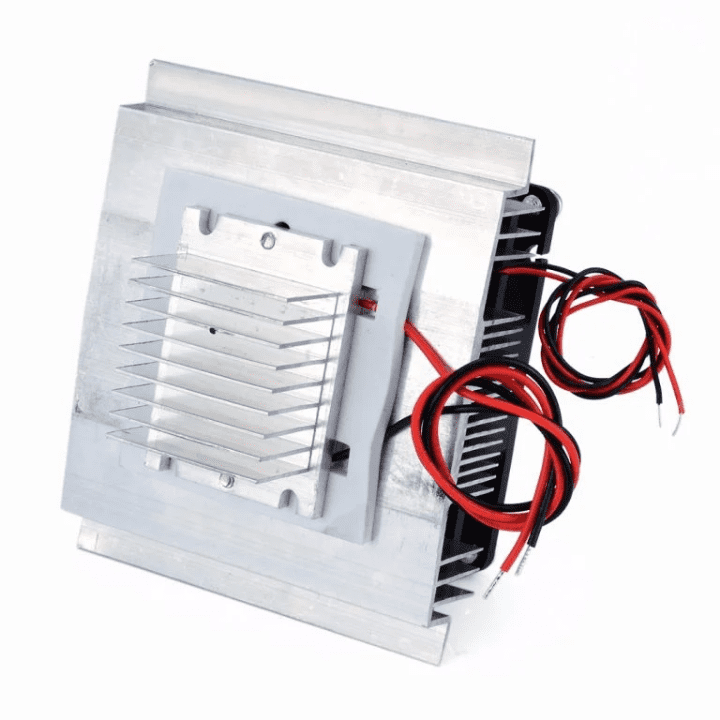
Thermoelectric Peltier Refrig…
Thermoelectric Peltier Refrigeration Cooling System DIY Kit
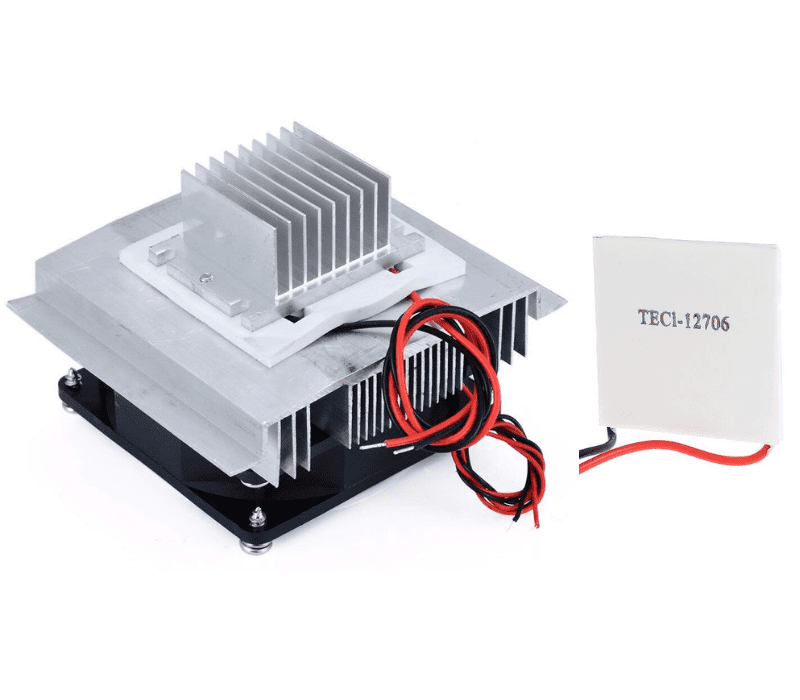
Semiconductor coolers are a form of solid-state cooling that incorporates both semiconductor technologies and electronic assembly techniques. The thermoelectric Peltier refrigeration cooling system DIY kit is one such example.
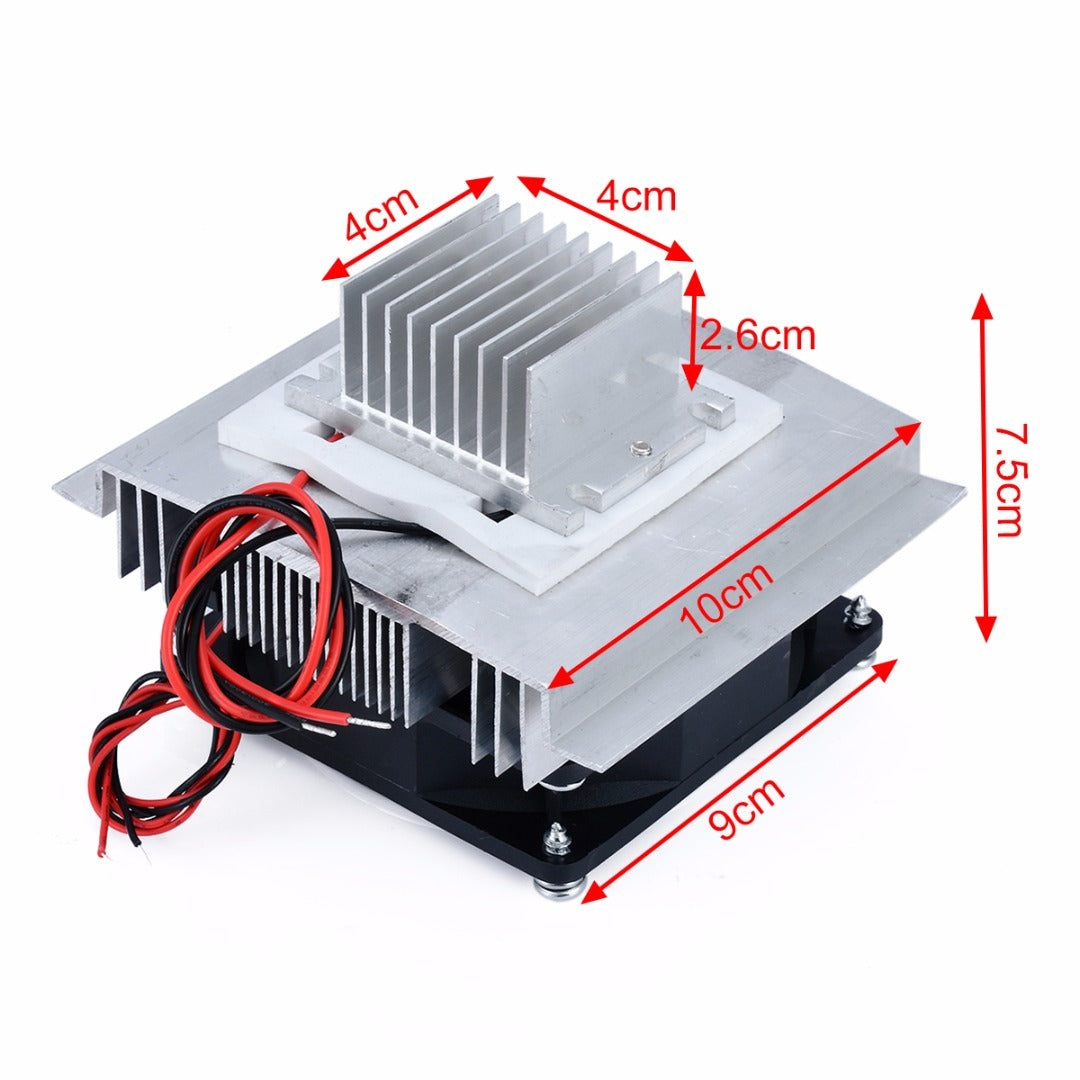
The Thermoelectric Peltier Refrigeration Cooling System DIY Kit is a semiconductor cooling kit that uses a TEC1-12706 Thermoelectric Cooler 6A Peltier Module. The kit has 2 heat sinks, the bigger one is for the hotter side and the smaller one is for the cooler side. The bigger the heat sink, the greater dissipation of the heat.
The fan, also included in this kit acts as a radiator. This is attached to the bigger
heat sink
. The
TEC1-12706 thermoelectric Peltier module
is sandwiched between the two heat sinks. The module will reduce the temperature.
Note:
This is an unassembled kit.
This Kit does not include the TEC1-12706 thermoelectric Peltier module.
If you are looking for a similar Cooling System Kit with
TEC1-12706 Thermoelectric Peltier Module
Click Here
How To Assemble The Thermoelectric Peltier Refrigeration Cooling System DIY Kit:
First, take the large heatsink and the cotton washer (which will hold the Peltier in place), remove the cotton washer’s sticker and place it on top of the large heat sink, making sure to align it.
Apply thermal grease or heatsink compound before installing the
TEC1-12706 Peltier
module
(the heatsink compound/thermal grease increases the heat transfer rate).
Then, firmly press the
TEC1-12706 Peltier
module
against the heatsink (Remember the cold side of the Peltier module is always the surface with letterings)
Apply the heatsink compound/thermal grease above the
TEC1-12706 Peltier module
and place the small heatsink on top of it and attach the screws
Place the brushless dc fan on top of the large heat sink, align it properly, and screw it in place. Next, attach the safety grill to the brushless dc fan and then screw it in place.
Read our blog
Peltier module working principle
where we explained what is a Peltier Cooler, how it works, things to keep in mind while using a Peltier, and applications of Peltier.
Applications:
Pet Air Conditioner.
Portable refrigerators.
Medical instruments.
₹388.35
MRP. ₹768.60
Incl. GST (No Hidden Charges)
Incl. GST (No Hidden Charges)


Thermoelectric Peltier Refrigeration Cooling System DIY Kit without TEC-12706 Peltier
Thermoelectric Peltier Refrigeration Cooling System DIY Kit Semiconductor coolers are a form of solid-state cooling that incorporates both semiconductor technologies and electronic assembly techniques. The thermoelectric Peltier refrigeration cooling system …
As low as
₹388.35
₹388.35
MRP. ₹768.60
Incl. GST (No Hidden Charges)
Third Hand Tool with Magnifyi…
Third-Hand Tool with Magnifying Glass
This is a 60mm Magnifying Glass Multifunctional Welding Fixture. This is a useful tool for soldering, electronics, and model construction. This tool’s third-hand clamp is useful for the jeweler and the Electronic Engineers who use a magnifying glass. There are numerous configurations for the two adjustable locking arms with alligator clip jaws and magnifying glass. The magnifier improves the field of vision for small objects, and the heavy, sturdy cast-iron base keeps the work from moving around.
Third-Hand Tool with Magnifying Glass - ZD-10D is a helper for your soldering work. It has a PCB frame with a real-glass magnifier for an improved view. The cast iron base ensures a secure position. Ideal for working on small PCBs, components, clocks, etc.
The base surface is padded with metal sheet to increase base weight and reinforce stability. - Perfect for electronic welding, modeling, stamp collecting, embroidery, antiques, biological observation, reading, jeweler working, etc.
check out :
Helping hand Magnifier Led Glass with Soldering Stand
Features:
Adjustable Arms: Features adjustable arms with alligator clips that can hold small components, wires, or circuit boards securely in place.
Magnifying Glass: Equipped with a magnifying glass to provide a closer view of the work area, enhancing precision.
Heavy Base: The heavy-duty base ensures stability, preventing the tool from tipping over during use.
Hands-Free Operation: Frees up your hands, allowing you to work more efficiently and safely.
Versatile Movement: Adjustable joints allow for versatile movement in all directions.
Solid Gripping: Two solid gripping alligator heads for secure holding.
Applications:
Electronic welding
Modeling
Embroidery
Biological observation
Jeweler working
₹430.63
MRP. ₹754.60
Incl. GST (No Hidden Charges)
Incl. GST (No Hidden Charges)


Third Hand Tool with Magnifying Glass
Third-Hand Tool with Magnifying Glass This is a 60mm Magnifying Glass Multifunctional Welding Fixture. This is a useful tool for soldering, electronics, and model construction. This tool’s third-hand clamp is …
As low as
₹430.63
₹430.63
MRP. ₹754.60
Incl. GST (No Hidden Charges)
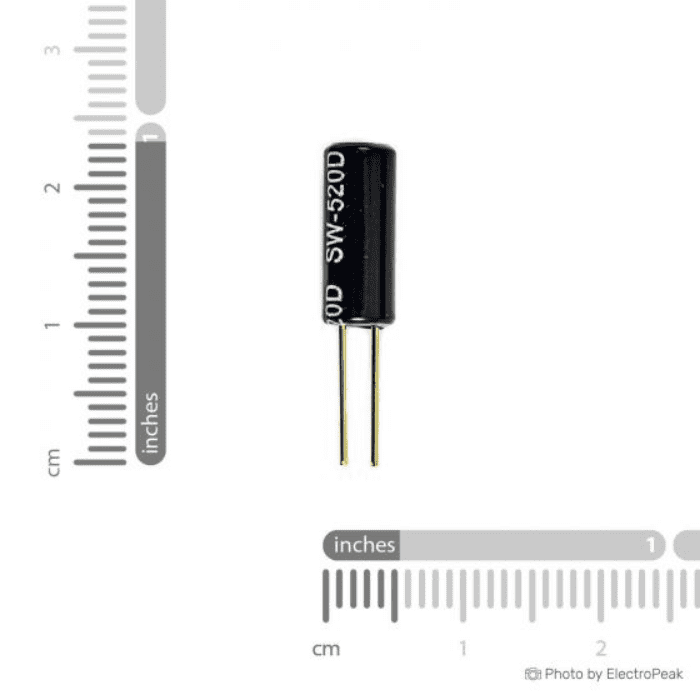
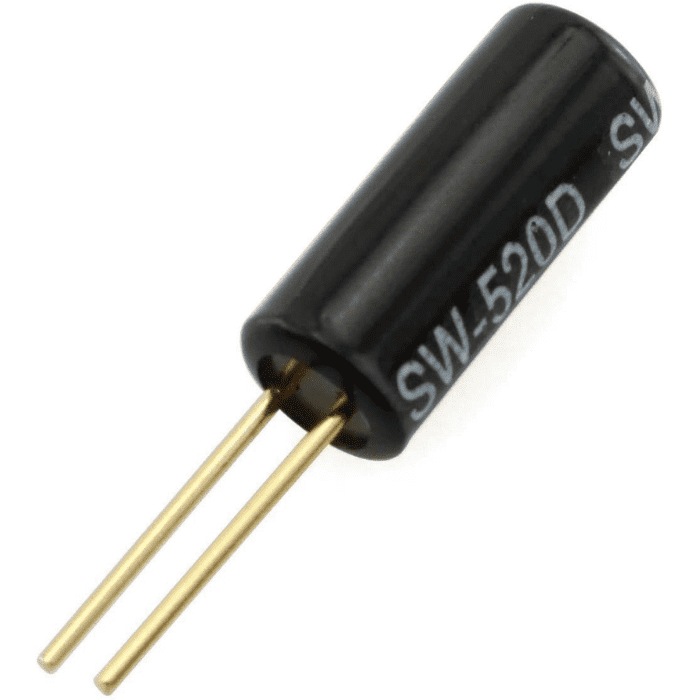
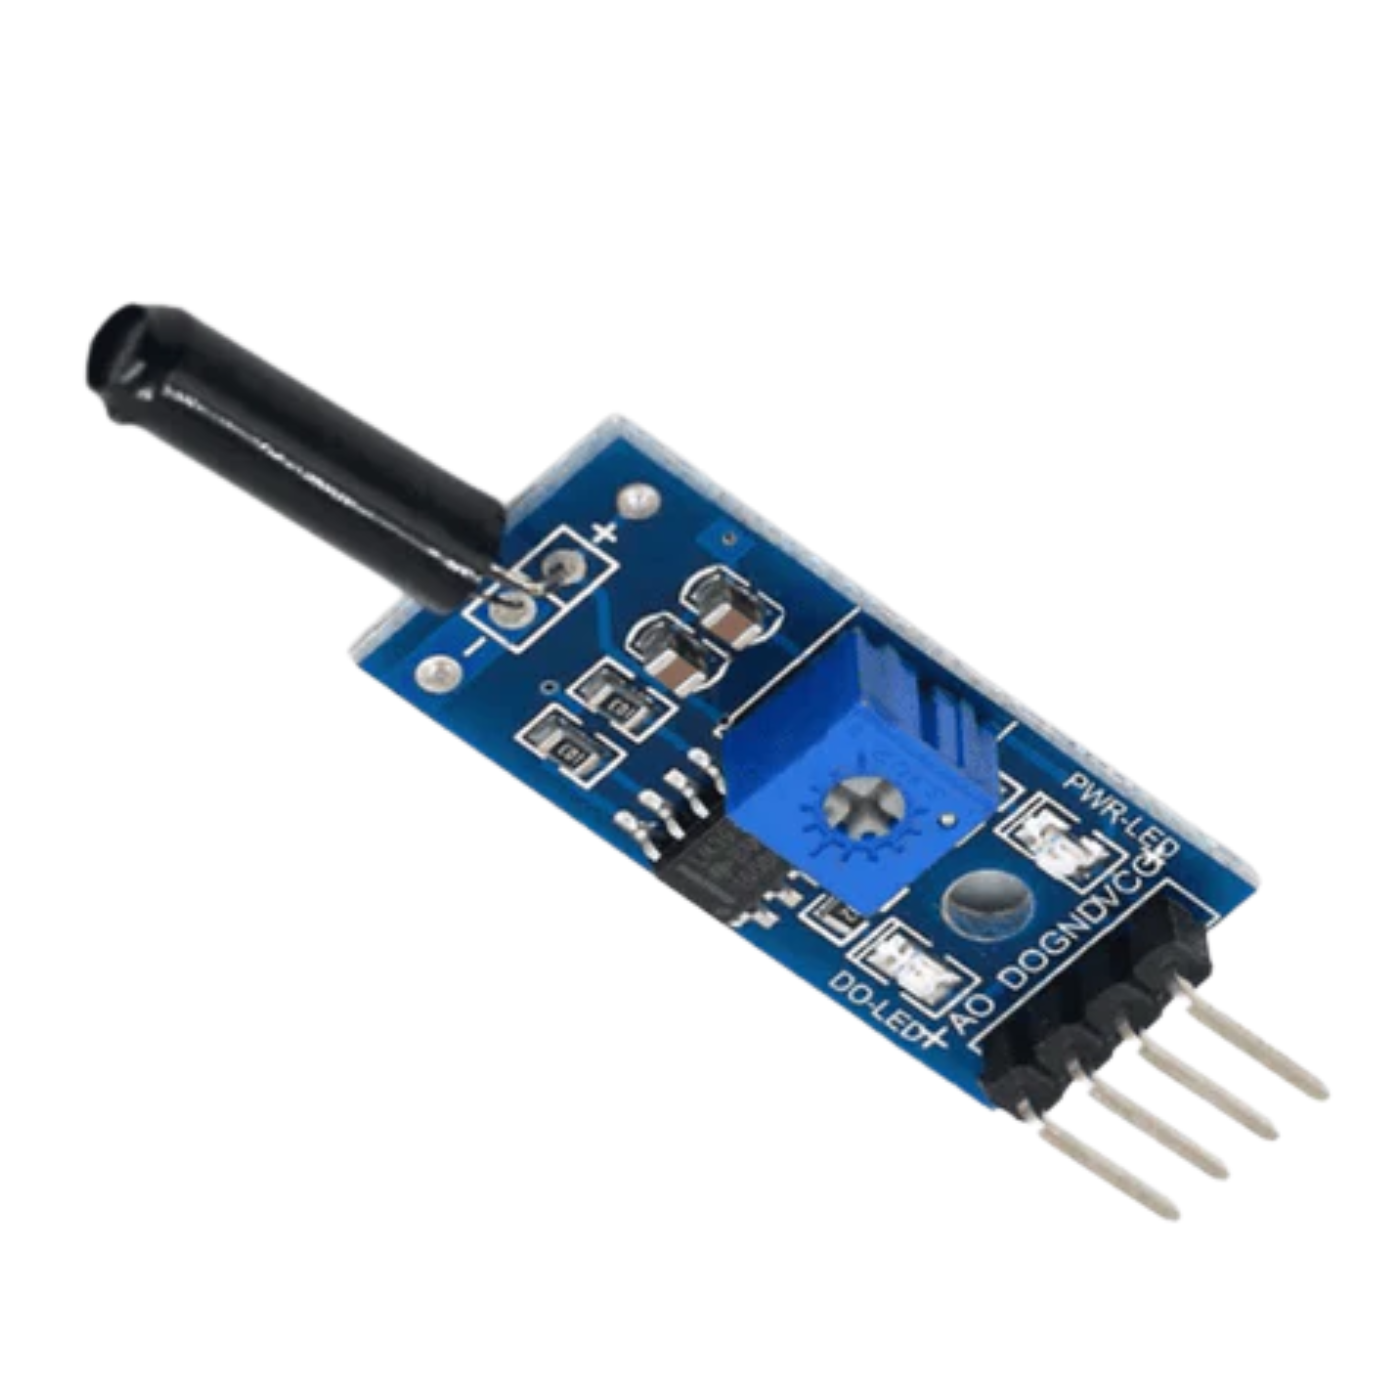
Tilt Sensor
Tilt Sensor
Tilt sensors allow you to detect orientation or inclination. They are small, inexpensive, low-power and easy-to-use. If used properly, they will not wear out. Their simplicity makes them popular for toys, gadgets and appliances.
This
sensors
is a solution for where you need detect when something has shifted from it’s desired orientation. It’s a simple ball-in-a-sleeve that when rolled to one end closes a contact. Actually, it’s a pair of balls, the second ball reinforces the bridging of the contacts by the first ball.
In it’s simplest application, it could be hung straight down and would close only if it were swung over 90° in any orientation. Team up 2 or 3, adjust the angles, and you could have it report when orientation shifts past any one of their angles. Sort of a really poor-man’s gyro/g-force sensor.
Note: The orientation of the pins will affect the responsiveness of the sensor. Laid horizontally, the balls will bridge the sensor pins much more easily than if the pins are laid vertically.
check out :
KY-010 Broken Light Blocking Sensor
Applications:
To detect the position of hand-held game systems and in game controllers
To indicate the roll of boats, vehicles and aircraft
To measure the angle at which a satellite antenna 'looks' toward a satellite
To estimate the height of a tree or building
To measure the steepness of a ski slope
To provide a warning system for the surface tilt angle of cryogenic liquids during transportation
To monitor laser levels and seismic activity
₹10.02
MRP. ₹28.00
Incl. GST (No Hidden Charges)
Incl. GST (No Hidden Charges)

Tilt Sensor
Tilt Sensor Tilt sensors allow you to detect orientation or inclination. They are small, inexpensive, low-power and easy-to-use. If used properly, they will not wear out. Their simplicity makes them …
As low as
₹10.02
₹10.02
MRP. ₹28.00
Incl. GST (No Hidden Charges)
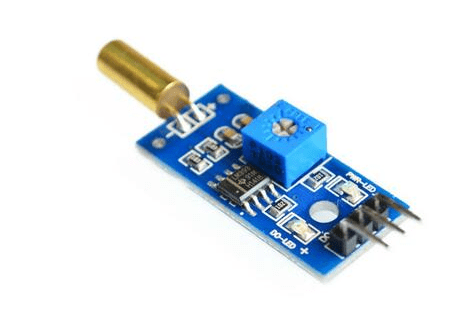
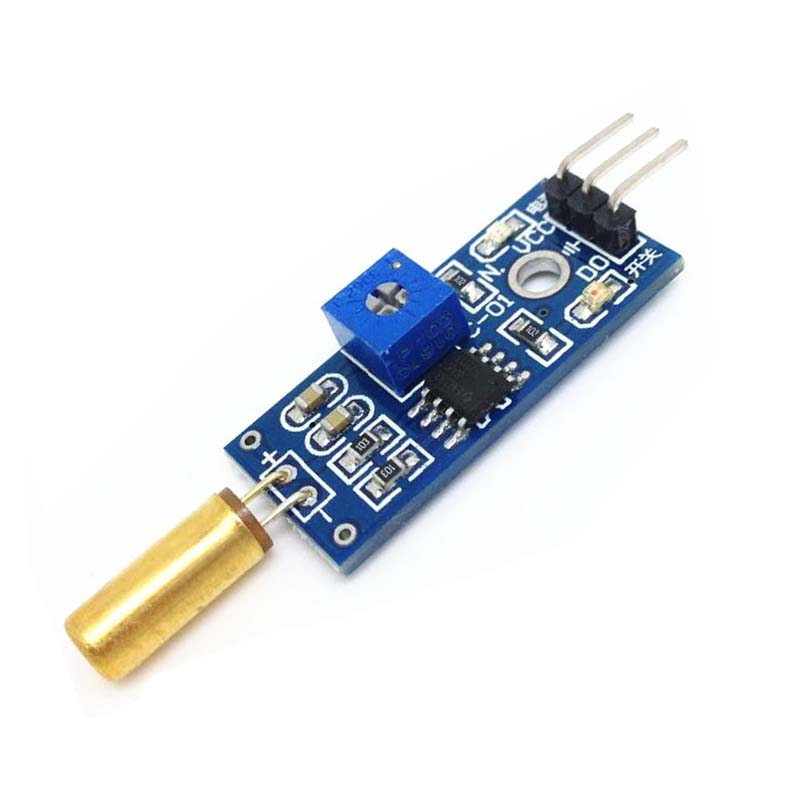
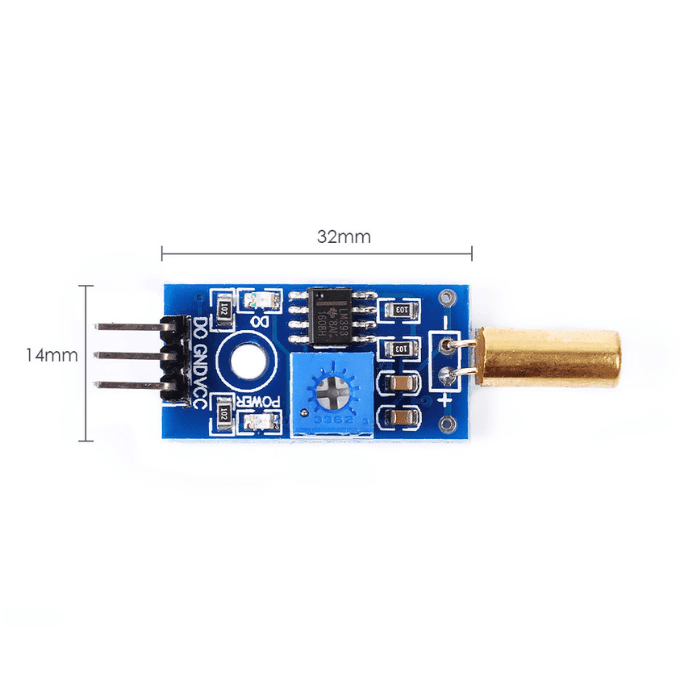
Tilt Sensor Module
Tilt Sensor Module
The Tilt Sensor Module for Arduino comes with the basic components for operation. Supplying power and it is good to be used. Attach the inclinometer sensor
to an object and it will detect whether the object is tilted. Simple usage as it is the digital output, so you will know whether the object is tilted or not by reading the output. It uses SW-460D or SW-520D tilt sensor. The Tilt Sensor is the ball rolling type, NOT Mercury type.
The tilt
sensor
Comes with an M3 mounting hole for ease of attaching it to an object. Onboard, it provides a tilt switch, high sensitivity and commonly being used for tilt detection. The module comes with a power LED and a status LED for the visual indicator.
Module instructions:
The switch output of the module depends on the on and off of the angle switch. When the angle switch is off, the DO output is high, and when the angle switch is turned on, the DO output is low.
The output terminal can be directly connected to the single-chip microcomputer, and the high-low level is detected by the single-chip microcomputer, thereby detecting the angle change.
The output terminal can directly drive the relay module, which can form a high-power angle switch to protect the automatic power-off function when the products such as electrical equipment are dumped.
Connecting a Tilt Sensor Module to an Arduino-
Connecting a tilt sensor module to an Arduino is a simple process that can be done by following the steps below:
Insert the tilt sensor module onto the breadboard or PCB, taking care to align the pins.
Connect the tilt sensor module's power and ground pins to the Arduino board's power and ground pins.
Connect the tilt sensor module's output pin to one of the Arduino board's digital input pins.
To read the data from the tilt sensor module, upload a sketch or software to the Arduino board. The sketch may utilise the digitalRead() method to read the state of the input pin and calculate the tilt sensor angle.
After uploading the programme, you can test the tilt sensor module by tilting it in different directions and seeing the output on the Arduino.
Applications:
Vibration and movement-activated devices
Stability of platform
Test & detection device
Pin Connection:
VCC = 5V
GND = 0V.
DO = digital output from module
₹45.62
MRP. ₹71.40
Incl. GST (No Hidden Charges)
Incl. GST (No Hidden Charges)

Tilt Sensor Module
Tilt Sensor Module The Tilt Sensor Module for Arduino comes with the basic components for operation. Supplying power and it is good to be used. Attach the inclinometer sensor to …
As low as
₹45.62
₹45.62
MRP. ₹71.40
Incl. GST (No Hidden Charges)
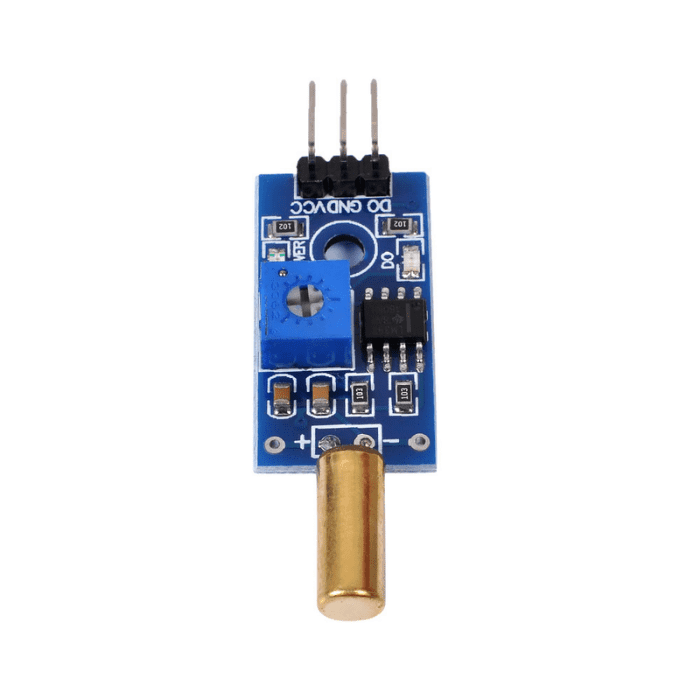
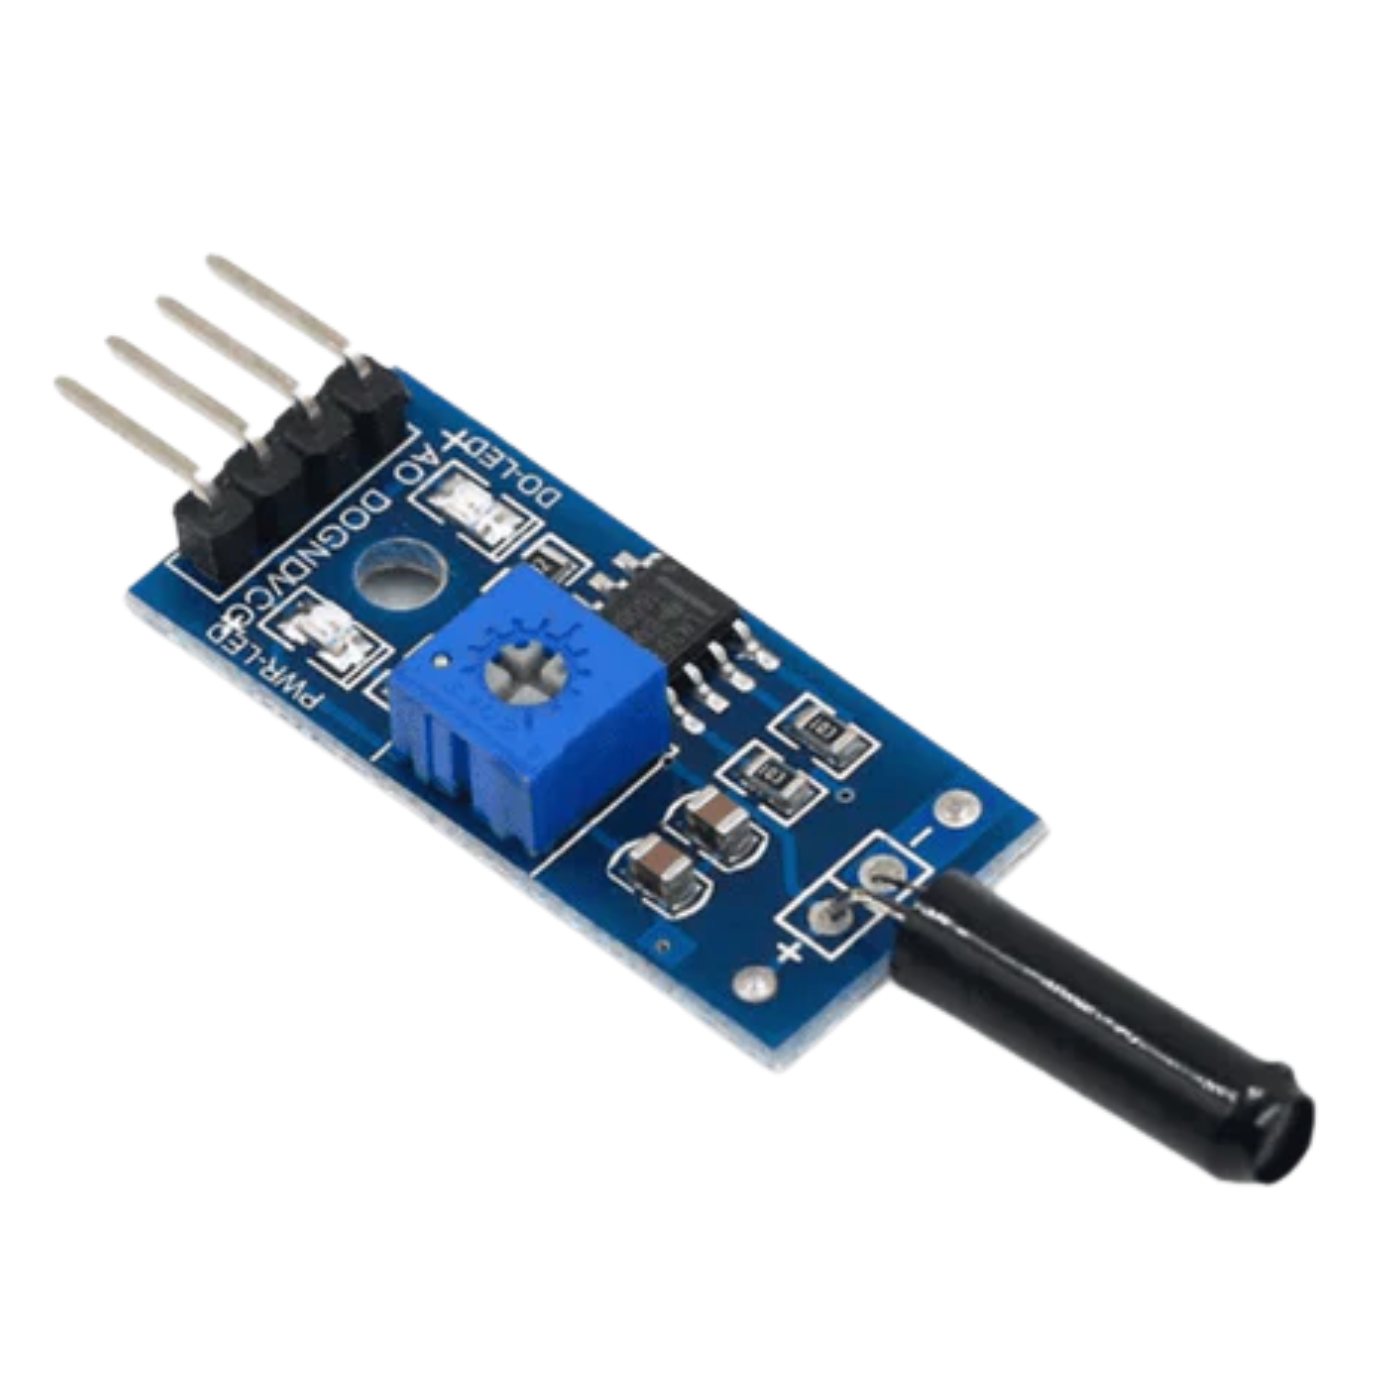
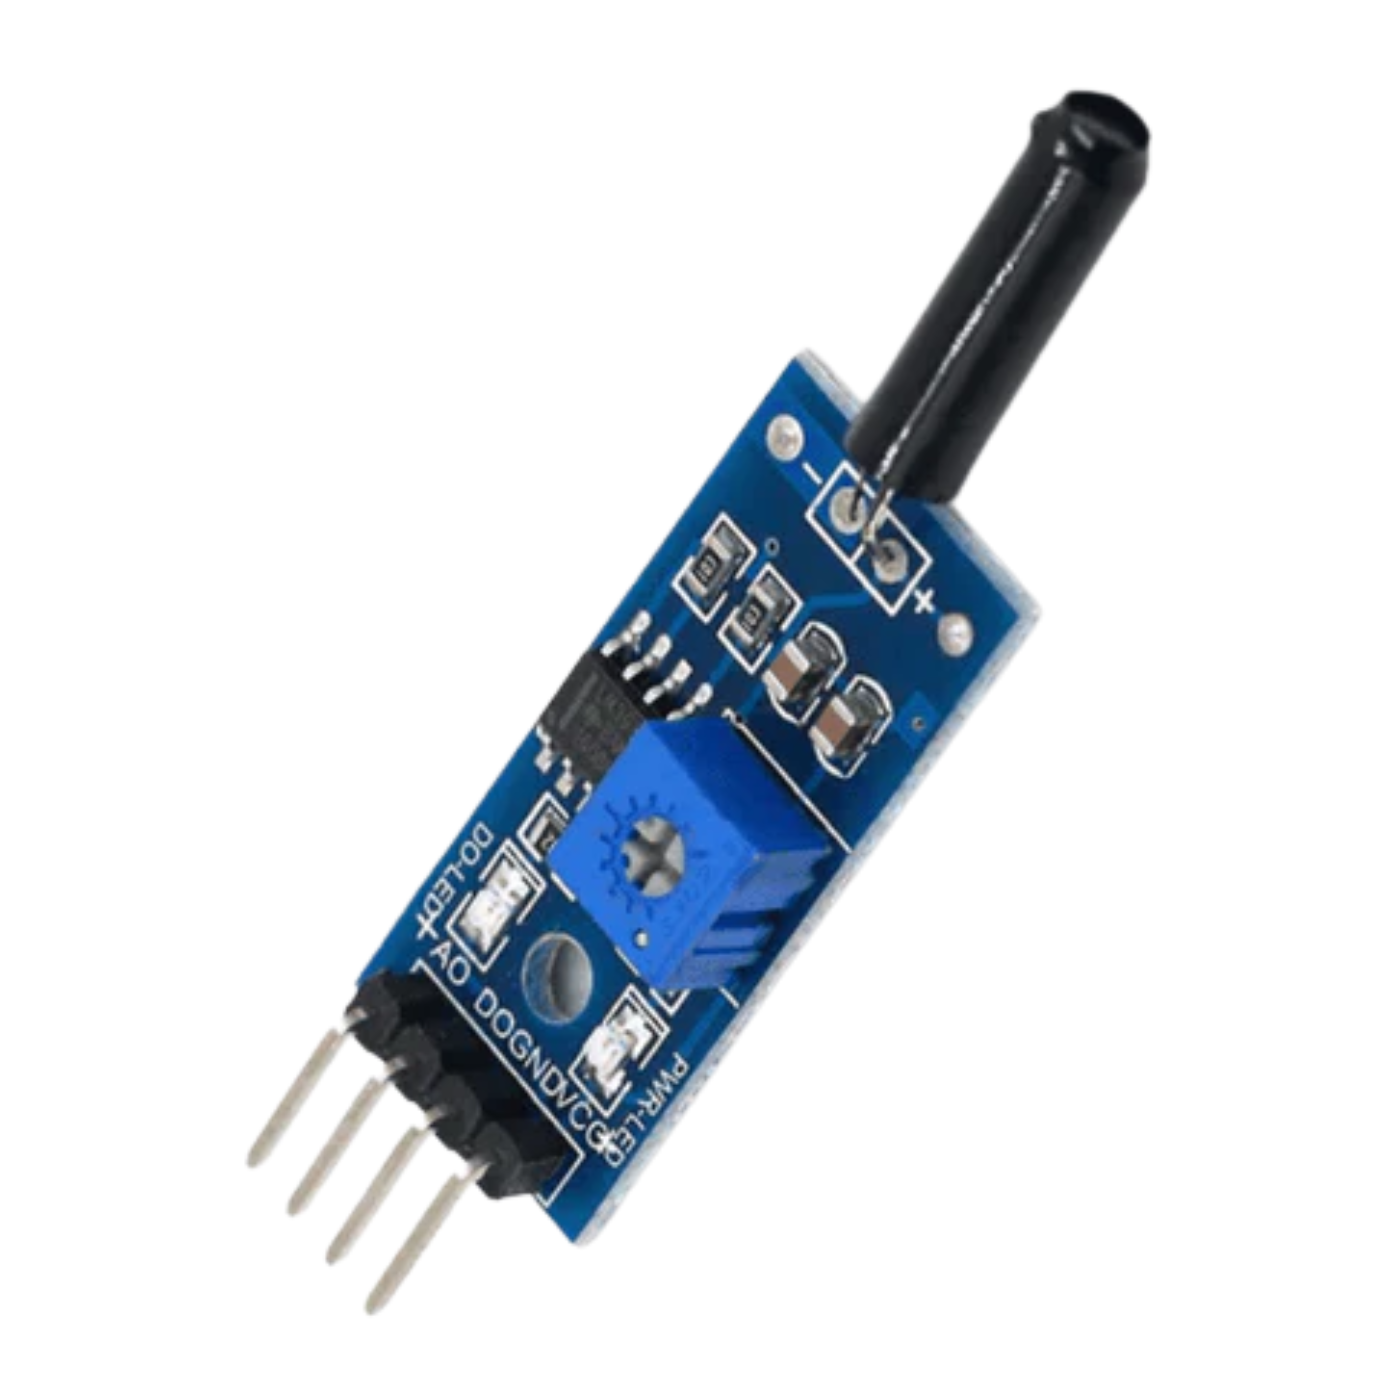
Tilt Sensor Vibration Alarm V…
Tilt Sensor Vibration Alarm Vibration Switch Module for Arduino - Black
The Tilt Sensor Vibration Alarm Vibration Switch Module for Arduino come with the basic components for operation. Supplying power and it is good to be used. Attach it to object and it will detect whether the object is tilt. Simple usage as it is the digital output, so you will know the object is tilt or not by reading the output.
It uses SW-460D or SW-520D tilt sensor. The Tilt Sensor is the ball rolling type, NOT Mercury type. Comes with an M3 mounting hole for ease of attaching it to an object. On board, it provides a tilt switch, high sensitivity and commonly being used for tilt detection. The
sensor module
comes with power LED and status LED for the visual indicator.
The module will output logic LOW when the module is not tilted until the threshold angle; it will output logic HIGH when it is tilted over the threshold angle. We have tested, the tilt angle is quite big, from 45 degrees to 130 degrees. However, it depends on the angular velocity too. It can be used as a vibration sensor too.
It can be interfaced with any microcontroller with digital input such as 8051, PIC, SK40C, SK28A,SKds40A.
Pin Connection:
VCC = 5V
GND = 0V.
DO = digital output from module
₹55.64
MRP. ₹95.20
Incl. GST (No Hidden Charges)
Incl. GST (No Hidden Charges)
Tilt Sensor Vibration Alarm Vibration Switch Module for Arduino
Tilt Sensor Vibration Alarm Vibration Switch Module for Arduino - Black The Tilt Sensor Vibration Alarm Vibration Switch Module for Arduino come with the basic components for operation. Supplying power …
As low as
₹55.64
₹55.64
MRP. ₹95.20
Incl. GST (No Hidden Charges)
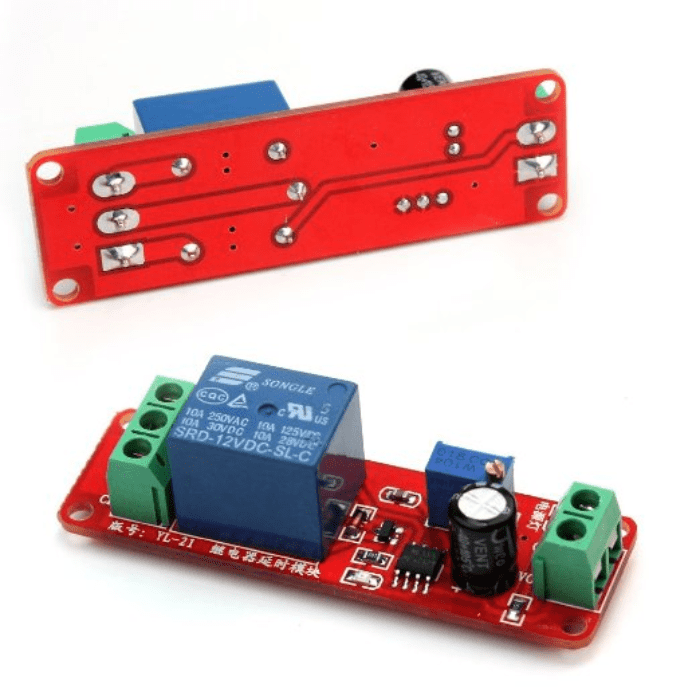
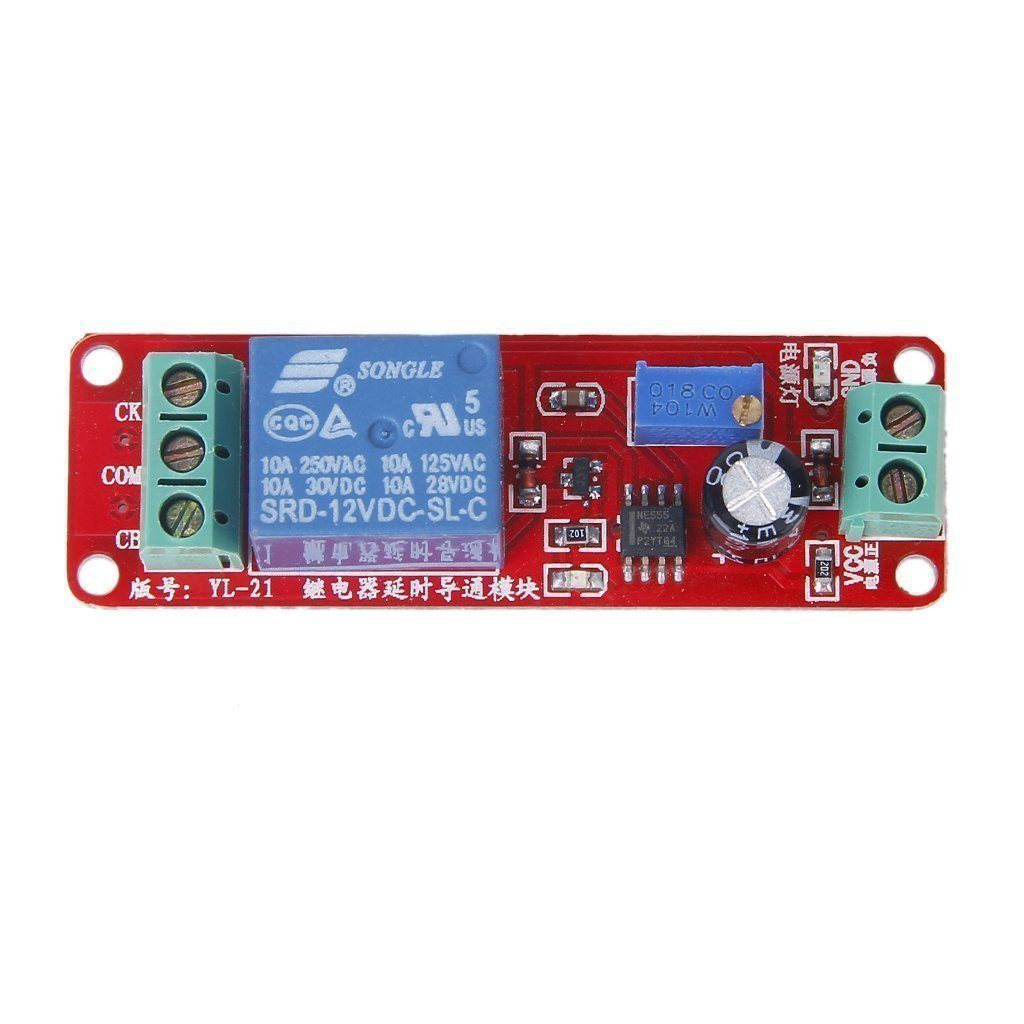
Time Delay Relay Module (0-10…
Time Delay Relay Module
This NE555 Delay Monostable Switch Module item is a timer switch module, based on the NE555 chip, a high-performance timing CPU design. The power indicator LED and switch trigger timing indication LEDs. Timing from microseconds to long hours. Applicable to vehicle equipment-delay to prevent car ignition, prevention of high sudden current to burn components and devices.
This NE555 Delay Monostable Switch Module item is a timer switch module, based on the NE555 chip, a high-performance timing CPU design. The power indicator LED and switch trigger timing indication LEDs. Timing from microseconds to long hours. Applicable to vehicle equipment-delay to prevent car ignition, prevention of high sudden current to burn components and devices.
This is a monostable generator based on the NE555 integrated circuit. It has an adjustable delay time from 0 to 10 seconds using the potentiometer or by changing the capacitance. It is also capable of controlling the device below 220V/10A.
Also, read our blog on the
Application of Relay
detailing what a is Relay- Working, its Applications & Types.
₹74.55
MRP. ₹141.40
Incl. GST (No Hidden Charges)
Incl. GST (No Hidden Charges)

Time Delay Relay Module (0-10 seconds)
Time Delay Relay Module This NE555 Delay Monostable Switch Module item is a timer switch module, based on the NE555 chip, a high-performance timing CPU design. The power indicator LED …
As low as
₹74.55
₹74.55
MRP. ₹141.40
Incl. GST (No Hidden Charges)
